Thursday, 31 December 2015

Double Cast On

It's the beginning of a brand new year. What's on your knitting resolution list? Do you have one? Any other resolutions are not happening here. I'm not going to resolve to loose weight, eat better, exercise more, in general be a better person because, well, you know what those resolutions cause: guilt and anguish. Not going there.

My knitting resolution is to learn new things and pass them on to you. A win-win. Here's the first one. I learned a new cast on, a variation of the Longtail Cast On. If you're Not familiar with longtail cast on already this will be greek to you but ... if you want to try something new here it is.

Double Cast On. It's nicknamed My Way, Your (new) Way or Regular Way, New Way. In essence you are casting one 1 stitch in the regular longtail way and a second stitch in a new way. The only thing that's different is the yarn over the thumb.

The first stitch is your slip stitch. That counts as stitch#1 (the regular way).

That means the second stitch is the New Way. It starts with the thumb. Swing your thumb to the front and under the front strand of yarn, coming up through the middle of the strands from the bottom.
Bring your needle down to the front of your palm. It looks a little different from the regular longtail cast on. If you think of your thumb as a needle, your stitch is sitting backwards.

 Continuing to think of your thumb as a needle, insert your needle into the back of the stitch (under the back strand on your thumb).

 Take your needle over the strand on your index finger.

 And bring your needle back through the stitch (loop) on your thumb.
 Snug it up to the needle. One stitch cast on. You can see a bar is produced across the front of the 2 stitches.

 Stitch#3 is your regular longtail cast on and stitch#4 is the new way. Two more stitches cast on with a bar holding them together.
 Getting into the swing of it? Old way, New way, Old way, New way.
Join in the round and work 2x2 rib.
Here's a very amateurish video (also part of my learning resolution) of the process with no sound, sorry, new camera needed.
Happy New Year,
Deb

Thursday, 24 December 2015

Deadline is reached

All you Christmas knitters, it's here. I hope tonight you're just sewing in ends and everything is done. All my boot sock knitting went to pre-Christmas December birthdays and although I thought I might do more for the big day, it didn't get done. So I started some socks for myself just because I don't want to panic-knit. I'm so taken with this spiral stripe business I started a new sock in sock yarn. Merry Christmas to me. One sock done.
I started with my bag of odd balls of sock yarn.
I narrowed it down to 4 colours.
Decided to stick with 3 colours: the pinkish variegated, semi-solid purple and green.
Three colours, divide my sock into two sections, front and back of leg and away I go. I'll write this out in a future post. You might find yourself with a few more odd balls in your stash.

Have a wonderful Christmas Everyone,
Deb & Lyn

Friday, 18 December 2015

Spiral Hat

Our knitting guild is involved in the 25,000 Tuques initiative. One hat for every refugee coming to our cold country. I can't imagine having to endure a first winter here when you come from a hot country. Let alone all the other problems they are facing. So I'm taking up Jed's suggestion and applying spiral stripes to my hats. I am diving into my stash for all those little odd balls of yarn that are left over from previous projects.

Here it is:  get 4 colours of yarn, small odd balls, 5.0mm/US8 circular needle (40cm/16" long).
Small Child sized Hat. It works for any size of hat.

With Colour 1, Cast On 72 sts with Worsted weight or Heavy Worsted weight yarn. Place Marker and join in the round.

Work a Brim in 1x1, 2x2 rib or whatever you like. I knit 4 rounds and then purled 1 round.

Body
In next round place 2 more Markers. You need to divide your work into 1 less section than you have colours. I have 4 colours so divide my hat into 3 equal sized sections with the Markers.
Next Round: K24, Place Marker, K24, Place Marker, knit to end of round.

Stripes:
Here we go. DO NOT TWIST stitches as you change colours. I finished here with light gray, now I'm picking up the Dark Gray which was waiting there for me.
I'm going to knit with the Dark Gray. The colours are not twisted around each other.
Here's my latest hat:
And at the change of colour:
Here we go:
Round 1:  With Colour 2, knit to first Marker, slip Marker, with Colour 3 knit to next Marker, slip Marker, with Colour 4 knit to end of round.

Round 2:  With Colour 1 knit to first Marker, with Colour 2 knit to next Marker, with Colour 3 knit to end of round.

Round 3:  With Colour 4 knit to first Marker, with Colour 1 knit to next Marker, with Colour 2 knit to end of round.

Round 4:  With Colour 3 knit to first Marker, with Colour 4 knit to next Marker, with Colour 1 knit to end of round.

Every time you come to a Marker the colour you need to knit next is right there waiting for you. You will not be able to see where the colour changes are made. It's a fun knitting trick!

Work the Crown in your normal way. If you don't have one, here's one:
Divide your knitting into 8 sections and place markers. For this hat, 72 sts divided by 8 is 9 sts.
Marker Round:  *K9, Place Marker; repeat from * to end of round.
Decrease Round:  *Knit to 2 sts before Marker, K2tog; repeat from * to end of round.
Next Round:  Knit.
Repeat last 2 rounds until 8 sts remain. Cut yarn and thread through 8 sts, cinch up and secure. You're done.

Enjoy,
Deb


Wednesday, 9 December 2015

Can't Stop Spiral Stripes

Having fun with stripes. I've done 3 pairs now and I can't seem to stop. Help!
First pair.
Second Pair already given away to a grateful sock wearer. 
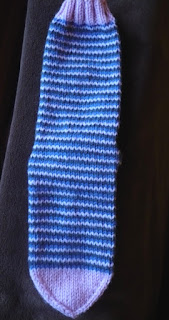
Third pair, have run out of most of light gray so picked up some blue. This system of spiral stripes works much better with a traditional heel flap. Happier with these.
Since I can't stop I'm scrounging around for more part balls of worsted weight yarn. But I'm going to switch to hats for charity. I can use even more little bits of yarn. Yay.
-Deb
P.S. Thanks CathyK.

Wednesday, 2 December 2015

Spiral around and around.

No more snow but now I'm hot on the trail of Christmas knitting. I'm knitting socks. No not in sock wool, that would be crazy! I'm thinking worsted weight boot socks are much more practical to be knitting with only 23 days to go. And after all I can't be 100% sure my daughter's boyfriend will wear them. But if you're going to be part of our family, wearing knitting is required. One men's pair done.

Now I'm working on a pair of coloured socks in 3 colours. All the colours spiral up the sock.

This is what I did. I divided my sock into 2 sections, the Top of foot and the Bottom of foot. First I knit across the Top of the foot in Dark Gray, dropped the wool. Knit across Bottom of foot with Pink, dropped the wool. Knit across Top of foot with the 3rd colour, Light Gray. All  3 colours are now engaged. (On the Top of foot I have a Dk Gray stripe and a Lt Gray stripe.)
At the end of this needle, I drop the Lt Gray wool I just knit with. The Dk Gray wool is very conveniently waiting there from the previous stripe. Pick up the Dk Gray wool and knit across Bottom of foot. On and on, around and around, picking up the new colour wool that is conveniently sitting there to knit across the next needle.
The trick, and you know there always is always a trick, is NOT twist your colours when you change colours.
I want the Dk Gray stripe to continue across the new needle for a stripe above the pink. This is way more confusing than it is to work. This is where I changed colours. No break in the stripe. No jog because the stripes just continue to spiral around. I think I love this.

I've done these socks from the toe up but it would work much better from the cuff down because of the heel. So for the next pair I'm coming down from the top with a traditional heel flap and gusset. I think I could use up a lot of odds and ends this way.

Deb


Wednesday, 25 November 2015

Knitting with my first cup of coffee

Today started out really well. By 8am I was sitting on my couch with my first cup of coffee knitting a sock and looking at the snow outside. It's finally winter. The snow boarders are jubilant. It snowed and snowed and snowed. I love it. Even though I have shoveled the driveway 3 times and the power went out 5 times so far, it's still beautiful.
It was looking like a Christmas card out there. The air was crisp, the flakes were falling and the sound of snow blowers filled the air.

It put me in the Christmas spirit. For the last couple of years I have not been knitting much for gift giving but this year I feel the urge. I started a pair of socks last night and today given one more hour to knit I will have turned the heel. I'm working on the theory that a pair of boot socks (in DK or worsted weight yarn) can be done in one week. How many weeks before the big day? Just checked the calendar and there are 4 more weeks. Now to decide who gets socks! Wait, aren't mittens even faster. How many of those can I do in a week. Hmm.
Are you knitting for Christmas?
Deb
PS: Sharon, I also think of Purple as a neutral along with Navy Blue, two of my favs.

Thursday, 19 November 2015

Blocking before the end.

Blocking, do you ever do it before you finish the sweater?

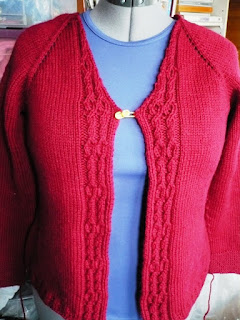
I put my Panel cardigan worked with Twisted Stitches from the Need A Plus Cardigan book on my adjust-to-size mannikin and was less than impressed since I was really careful about the gauge and thought I had it perfect. It was looking like I was going to have to work a really wide buttonband to bridge the gap in the front.

And the twisted stitches were pulling the back in quite a bit.
So I decided I would give it a soak and let it dry and see where I was.

I think I could hear my sweater saying "ahhhh, at last". It relaxed a whole lot. It looks so much better. The back Panel has relaxed and hangs straight.

The front is going to be fine once I do the buttonband. The next time I block with the buttonband in place the Front Panels will relax even more. Now I'm excited to get finished so I can wear it.
And it's RED. Just imagine the lift to my purple/blue wardrobe.
-Deb

Thursday, 12 November 2015

Discomfort vs Results

How far are you willing to go for the result you want? I'm not into discomfort when I knit, at least not usually, but I took the plunge for the results this time.
A top down sweater with different coloured panels. This is a testknit for the new children's book. It's going to look great. While knitting the yoke I had 7 balls of yarn hanging from my sweater, one for each section: buttonband, front, sleeve, back, sleeve, front and second buttonband. Ugh. After a couple of rows they did settle down into some semblance of order but I was still in a tangle most of the time. I did figure out that if I lined them up and turned my sweater a certain way at the end of the row the tangle was more manageable. I was thankful I only had to do about 6" of yoke for a 4 year old size.

How to decide to take the plunge? I knew it would look great when I was done. I knew it would not be a comfortable, sit in front of the TV kind of knit. I also knew it was only for the yoke. Knowing all that, it was totally worth it. I would do it again. That's the real test of discomfort vs. results.

Here's a finished adult size:

Worth it, right?
Deb

Thursday, 5 November 2015

Retreating

We had a wonderful time retreating. An odd word don't you think? Retreating from our regular life I guess?! There was knitting talk at breakfast, knitting and learning time, knitting talk at lunch, more knitting, knitting talk at dinner and finally knitting in our PJs. Isn't that your everyday life? Ha, ha.

We knit cowls. Lots of cowls. Look at all those finished projects. Most went home with a new cowl ready to wear and thoughts on what they were going to do on their next one.
They were all a little different since each knitter choose which of the 4 stitch patterns they wanted to knit. They had a couple of cast ons and neck edgings to choose from: cast on with beads or without, cast on with I-cord, add an edge with a twist. We nicknamed a new cast on "My way, your way", a variation of the long tail cast on where you can put in beads. More on this in a future post.
We also tackled that lovely phrase which I know you love to see "incorporate the increases into your stitch pattern". They were fearlessly.

A great weekend. Looking forward to our next 2 retreats in April.
Deb

Wednesday, 28 October 2015

Step or Graduate a stitch pattern

This week we've been working on our project for the Cabin Fever Retreat. There are only two more sleeps until we get started. Yay.

This weekend we are tackling those confusing words "incorporate the increases into your stitch pattern". Don't you just love to read that?

You can incorporate increases by stepping the pattern:
Work the increases until you have increased enough stitches on one side of your stitch pattern (at the raglan line) so that you can work one more full repeat of the stitch pattern.

This weekend we're going to work on gradually working some of the stitch pattern as each increase is added:

For a cowl with shoulder shaping:
It will be fun. Wish you were there,
-Deb

Thursday, 22 October 2015

Where is your waist?

I taught a "Get Fit" class last weekend and a question I always ask is "where is your waist?" Are you laughing yet?

We all know where our natural waist is. It's where you bend if you bend yourself to the side. You can also easily put your hand on your waist at your lower back. 

BUT... is that where your torso is narrowest when you look in the mirror? If your narrow part is at your natural waist, congrats. If not, you can still create a waist in your sweater.

There is no point in your sweater coming in at your natural waist if your body no longer goes in there. You are not alone here. I'm right with you. I am narrowest a couple of inches above my natural waist. You may be narrowest just below your bust. That's OK too. 

We're going to call this narrow spot in your torso your "sweater waist". That's where you can work some shaping into your sweater.

You can work decreases at the side seam (imaginary side seam if you're working in the round), one decrease on each side of the Front and one decrease on each side of the Back. That decreases your sweater body by 4 sts, approximately 3/4" in the medium gauges of yarn. I think working two sets of these decreases makes a very nice indent for your sweater waist. How far apart you work the 2 sets of decreases depends on how much room you have to work with. If you are putting your waist right under your bust you can work rows/rounds for 1/2" and do the second set of decreases. If you have more room on your torso to work you can work 1" of rows/rounds or more between decreases.

Work straight for 1" to 2" and then work the increases in the same manner back to the original number of stitches. You've created a lovely curve to your sweater.

The GOOD NEWS is that you can create a waist in your garment even if you don't have one. Your sweater is fairly stiffish fabric when finished and it will hold a curve for you. Yay.

If you don't have a waist in the front, you can work a waist on the Back only because all of us have a dip at the small of our back. This also makes a nice curve in your sweater.

If you need more room in the body Front, you know who you are, you can work the increases on the Front only, to accommodate a round belly. This also creates a curve and a better fit for your sweater.

A curvy sweater is better looking on everyone than a boxy sweater. If the pattern doesn't have some shaping built in then I would put some in. Create a curve. Even a small curve will make you look sensational in your sweater.

Do you add shaping? Tell me about it.

Happy shaping,
Deb

P.S. t_a So glad to hear from you. I'm glad to know you're lurking.

Thursday, 15 October 2015

Semi-Solid Big Wool

I got a little parcel from Lyn.
Doesn't that wool look scrumptious? Lyn dyed the wool just like the Cabin Fever Retreaters are going to. I have it to work up some cowl samples so they can see what can be done with the stitch patterns and other information we're going to work on over the Retreat weekend.

I've worked up one of the cowls with the Big wool from Shelridge Yarns in a solid colour. It's a bulky that knits to 12 sts = 4" on an 8mm needle, so it is Big. I think the cowls will look really great with the semi-precious, semi-solid wool. Can't wait to see how they look with the different stitch patterns we're including in the class notes.
It's not very many sleeps now until the Halloween weekend and our Retreat.
-Deb

Thursday, 8 October 2015

Double knitting, double your pleasure.

It's been a hurry, hurry, busy, busy week after a totally awesome, relaxing weekend at a knitting retreat. The Sticks, String and Stewardship retreat in Sudbury, ON is one I am not involved in organizing. I set up a display of Cabin Fever books and yarn then commence to enjoy knitting and chatting. I leave a book on the table where people write down what they take away and we settle up on Sunday. So civilized. But these women are dedicated charity knitters so if you can't trust them, who can you trust?

I took two classes. One on Double Knitting in a way I haven't done before. You carry both colours of yarn with you from the front to the back as you knit and purl. It makes a really cushy fabric and is totally reversible. You could have seen that the other side is blue with yellow grid lines, if I had been bright enough to turn it over and photograph it. I'm blaming yarn fumes.
The second class was working a zigzag strip where you join-as-you-go. I love the joining part especially. You guessed it, no sewing up. Yay.

I like an ambling sort of tempo to my week. But this was the first week of a couple of classes which will run for the next 2 months so was not that sort of week. Beginning is always filled with anticipation because I really like to teach and anxiety because I don't know quite what I'm walking into. I've started a Top Down night at Eliza's Buttons and Yarns in Barrie, ON, where I work part-time. So far I have two knitters working on two totally different top down projects. I'm hoping for a couple more knitters then these nights will really keep me on my toes.

I'm also teaching a beginner series of classes at the Ramara Community Centre, this year we're knitting mittens, then a Mosaic hat. I'm thinking of suggesting a cabled scarf for after Christmas just to round out their winter projects. I have a brand new knitter in this class. It's so wonderful to see someone pick up needles for the first time and actually knit some fabric, on double pointed needles no less, talk about jumping in at the deep end. She did wonderfully well.

Now back to regularly scheduled testknitting. I'll have some more done by next week.
-Deb

Thursday, 1 October 2015

Testknit sweaters

Testknitting for the 4-14 year olds Pullover book is moving ahead. Here's a Henley Top Down Pullover in the largest 40" size knit by Elizabeth (co-author) for her nephew.
Having the option to knit the sleeves a different colour was the reason behind this design. We're really having fun thinking up colourways for this. My next one will be a child's sweater with a rhubarb red body and denim blue sleeves. Can't wait to see how it turns out. Then Elizabeth and I both want to make one for ourselves.

I finished a Shawl Collar Top Down in teal Cotton Tweed for a 7 year old. The button is a Popsicle, ha, ha.

And there is one more, a Tuck Stitch Hoodie with stripes. This looks like lots of fun to wear.

The pile of sweaters is getting higher and higher every week.
-Deb

Thursday, 24 September 2015

V-neck Testknit

One advantage to not having internet service is that it concentrates my "on line" time into several hours of at-the-library time. I have to be more organized about what I need to do every day. No chance to "oh yes I should just check that right now".  I make a list of jobs and get to tick them off one by one. It makes me feel so productive. It's good to get out of the house and sit at the Quiet tables with, from the look of them, young students from the University. I'm sure I blend in, NOT. Lots of clicking (some of it's my needles), no talking. Ahhh, it is lovely.

Update on the testknitting for the 4-14 year old Pullover book: I'm knitting the beginning of all of them. I have no idea when I will get around to finishing them. I do have other people knitting them too. Lots of information is coming in every day to finalize all the details.

I'm knitting the V-neck. Making the V employs short rows. The same technique is used in the Baby V book (downloads available on Ravelry: Baby V & Patternfish.com: Baby V) and the Button Up Your Top Down books. Cast On lots of stitches for the neckband, including lots of Front sts. Then work short rows, back and forth, with a decrease at the end which attaches the Front to the neckband and decreases a stitch. It works. It's awesome.

Last night I worked my short rows back and forth. I just realized that it looks like the V is attached in the round but it's not. I'm half way down the front neckband with my short rows.

Today I'm ready to join in the round.
Joined Up.

 The V will be closed with a button. I put a dime where the button will be just to give you the idea.

Now back to regularly scheduled raglan increases and knit rounds to the bottom of the yoke. Already most of the way there.
-Deb