Thursday 21 December 2017

Fish Lips Heel

Are you ready? All my sock presents are done, yay, so I started one more pair since I wasn't going to do "the Christmas thing" until after the holiday and now have time. I thought I would continue to explore different heels.

I'm knitting Queen's Castle socks which are toe up with a wrap & turn short row heel.
And this time I substituted in the Fish Lips heel which is also a short row heel but uses Twin Stitches instead of the wrap and turn.

I did the heel over 60% of my sock stitches instead of 50% which I think is used in that pattern. This gives me a higher instep and more room for the heel. If you find your socks are straining at the ankle you could try this with any short row heel.
I like it very much. I find the Twin stitch great to do even on dark coloured, fine sock yarn although it is a little more of a trick after a long day.

This is the beauty of learning lots of heel methods. I and you too, are free to sub in any of them at will, to add variety to sock knitting.

Have a Merry, Merry Christmas and a Happy Holiday. See you on the other side,
Deb

Thursday 14 December 2017

New to me Heel

Yikes it's coming up soon, the big day of the winter. It's sneaky. No matter how much you plan, it seems to jump closer and closer without you even noticing.

I'm on my last pair of Stash Buster socks using the Stacking Stripes method.

I'm trying a new heel which I'm loving.
This is the heel which acts as the gusset. You work increases on either side of 2 centre stitches every other round until you have doubled the back of the leg stitches. Work the increases into any pattern you like. I choose to work the increases into a K2, P2 pattern. Example: 60 sts on sock, 30 sts for back of leg, work increases until 60 sts on back of leg, total on sock is now 90 sts.

Then turn the heel using the standard V-heel short rows ending in SSK, K1, turn and P2tog, P1, turn. There is a trick, you knew that was coming right? You will get back to the original number of stitches and then have to continue to turn the heel for a couple more rows. On these rows work the SSK (no K1 afterwards) and turn. Work P2tog (no P1 afterwards) until you have your original number of sock stitches. Then work in the round again.

I have found it works great and gives a nice deep heel turning which I really, really like.

I first worked this heel using Vanilla is the New Black pattern. You might find this an easy heel too.
Cheers,
Deb

Friday 1 December 2017

Printed Spiral Striped Socks

I'm deep into Christmas knitting. Maybe you are too. I'm knitting socks and am on my third pair and on the home stretch with the second sock. Then I'm done. Whew, before the big day too. I'm patting myself on the back as I knit (makes knitting a bit awkward).

This was the first pair.
This a printed sock yarn (Comfort) and knits up beautifully. I had a second ball but didn't want to do exactly the same thing so I decided to Spiral Stripe it and see what happens.
It's the same printed wool but striped with navy. One stripe in printed wool and one stripe in a navy solid from my stash. I'm so happy with this. It changes the effect of the printed wool so much.
I used the same method as the Stash Buster Socks  which uses 3 colours but here I used 2 colours and only the switched colours in one spot. I've written about the technique in another blog which I call Spiral Stripes. In one sock I changed colours at the side of the sock and on another sock, in the middle of the back of the leg. It didn't seem to make much difference to the sock. The line you see in the centre of the photo is the dpn line which will disappear on washing.

I happen to have several 50g balls of different sock yarn in my stash. I think there will be more of these stripes socks in my future.

I hope your Christmas knitting is going well. What are you knitting?
Deb

Thursday 23 November 2017

Good Shaping, Wrong Garment

One of my new experiments is working... sort of. I like the deeper neckline. This particular neckline works by not working any raglan increases on the Front edge. Raglan increases are worked on the sleeve side of the Raglan Marker but not on the Front side, for about 3", while I worked short rows up against the neckband at the same time. Don't you just love "at the same time"?!
Can you see it now? Once the crewneck was done I reverted to the regular raglan increases on both sides of the marker.

Would it help if you could see it upside down exactly like it would be as if you were knitting it? You can't see the increases on the sleeve side but you can see that the sleeve is accumulating stitches.

It works but I don't think a crewneck pullover is the garment to use this on. I think it would work really well for a V-neck cardigan. I can almost see it in my head. So I'm saving it for that and just playing with this pullover for a bit.

I'm wondering if it would be fun to start moving the knit columns in the centre panel and make them move around, criss-crossing into a lattice. Would that look really weird when the top section is straight? Maybe I could have a bit of fun with it just under the bust and then work straight again. Maybe work hip shaping increases into the centre panel?! Hmm, I think I like that idea.

Time to play,
Deb

Thursday 16 November 2017

Change the Angle

T_a asked me what the difference was between the Spring Breeze neckline and the new ideas I have had for shaping the neck.

The Spring Breeze has the shaping system I have used in the Baby V, Button Your Top Down and Hoodies and Pullovers books. It works really well. I love using it.

Once the neckband is knit, the neck shaping is achieved by using short rows. On one side of the front the short rows end with SSK, K1 and Turn. The SSK is a decrease but it also attaches the front to the side of the neckband. The K1 kicks it over a stitch giving the neckband a 45 degree angle.

SSK, K1
         SSK, K1
                  SSK, K1
                           SSK, K1
I want to try to push this a bit and see if I can get a deeper neckline while still leaving myself some open stitches at the centre of the neckband to work a stitch panel down the front. What I've done is add extra rows that do not have a K1 at the end of the short row so do not bump the neckband over one stitch. It means that the angle is no longer 45 degrees. The extra rows add a short vertical section to the angle at the side of the neckband. One one side of the front the short rows end like this:
SSK, K1   attaches and adds to V shaping
         SSK,         attaches only, vertical
         SSK, K1,
                  SSK
If I was working a Top Down where the neckband is picked up afterwards, this is the equivalent of working an increase every 4th row. Of course I'm doing this the hard way but ... there you go, it's more fun.
I wonder what it would look like if I used P2tog instead of the SSK? That might work great. OK one more swatch just to see.
Deb

Thursday 9 November 2017

I'm There

I think I've got it. My experiments seem to have come to a successful system I can use.

I have a system where the neckband is worked first and then short rows are worked to lower the front by working more rows across the back of the neck.
I've used this neck shaping system in several books: Button Up Your Top Down, Baby V, Hoodies and Pullovers and any "Kid's" pattern leaflets from these books. It totally works and I have several sweaters that I wear using this system. It's straight forward and easy to work once you get your head around short rows in general. You may have worked with it already.
It looks great along the edge of the neckband.

It makes a lovely dropped front of neck.

I want to take it one step further and lower the front of neck a little further, to a full 3"/7.5cm, and still have stitches left open on the Front to work a stitch pattern.

My first experiment was to work an extra SSK row. It lowered the front sufficiently but is messy.
Next I tried using German Short Rows and took out the SSK decrease which didn't work so well. The short rows turns are worked on every stitch: work short row treatment from last row, work short row turn on next stitch. This leaves slight holes along the neckband.

But I like the general idea of using the short rows. So this time I separated the short row turns by one stitch: work short row treatment from previous row, K1, work short row turn. I used Short Rows with Twin Stitches which are easy to work and look great.
This is working very well. Nice smooth raglan line and the short rows look good against the neckband.
Yahoo. I'm excited. Now to get down to crunching numbers. I really need a new sweater so am anxious to get started on the real thing.
Deb


Thursday 2 November 2017

Almost There

I think I'm a little closer to what I have in my head. I want to start with the neckband and then work short rows to build up the back and lower the front. I am looking for a lower front of neck for more comfort. My last try at this works but it's messy.
I think this new trial is closer. It's smoother at the edges of the neckband and it's still nice and deep.
I used German Short Rows. I really like them. If you haven't tried them it's worth doing a little sample and giving them a shot. They are a great substitute for Wrap & Turn Short Rows.
But I'm taking another stab at it since I think this one is almost there.
Deb

Thursday 26 October 2017

Must be a better way

I can't stop thinking about the new problem I have set myself. They become an obsession but a good one. I am trying to make a raglan pullover with a lower crewneck than I have been able to acheive before.
I'm using short rows that raise the back of the neck ...
which in turn lowers the front of neck. You can see that the whole time I'm working more rows across the back of neck, I have yet to work across the entire front of neck.
I like the resulting lower front of neck.
Can you hear the BUT? It's messy.
I'm sure there is a better way to do this. I may have a couple of middle of the night revelations. I hope so.
Deb


Friday 20 October 2017

Did not work

It didn't work. I looked at everything I had to finish up in an attempt to convince myself to get one project done before beginning another. Abject failure.

I started a new pullover. I have to tell you, it felt terrific!

I am a little further on my Westward guild project. This shawl is definitely at that blob stage where it's outgrown the needle I have it on and looks like ... a blob.
I'm feeling a little ashamed but also happily knitting on my new sweater.
Deb

Thursday 12 October 2017

Overflowing

I'm taking inventory. I suspect I have way too much on my knitting plate and I want to start something new of course.

For those of you who knit one project at a time, this is how the other half lives. At least I seem to.

I am knitting the Westward shawlette. Sort of. I am taking a tiny step away from this pattern.

In our knitting guild we decided to pick out 2 or 3 colours of fingering weight yarn to knit a shawl this year. The Westward consists of 3 different Tiers where the stitch patterns change. No boredom allowed.

I have 3 colours (150g in total) so each of the Tiers of the Westward are going to be in a different colour. Tier One is a variegated yarn (Queensland Collection, Rainbow Beach). Tier Two is the coral colour (Juniper Moon, Herriot Fine). Tier Three is still up for grabs. I have a navy yarn which I think is going to be too dark. I am knitting each Tier to any size I want depending on the amount of yarn I have. Maybe this is running away with the pattern but the instructions for each Tier are still good to follow no matter what size or stitch count I have.

I have a really good rational for starting this new shawl. It is really, really necessary that I knit along with a shawl class I'm teaching. It's an 8 week class with 6 weeks left so lots of knitting time yet. I think I'm justified on this one. I am working with 100g of one colour (Misti Alpaca) and 50g of second colour (Gems, Louet). I'm curious to see how large it gets. I'm liking the contrast between the two teal colours.

Another knit along with a class I'm teaching on Ergonomic Mittens (Rowan Pure). This week we are knitting thumbs so I have to get that second mitten ready!

Our Cabin Fever Retreat is in a couple of weeks (last weekend in October) and these are the wristers that will be knit as the knitters play with stitch patterns and work colourwork with two hands. I should probably do some mates for them.

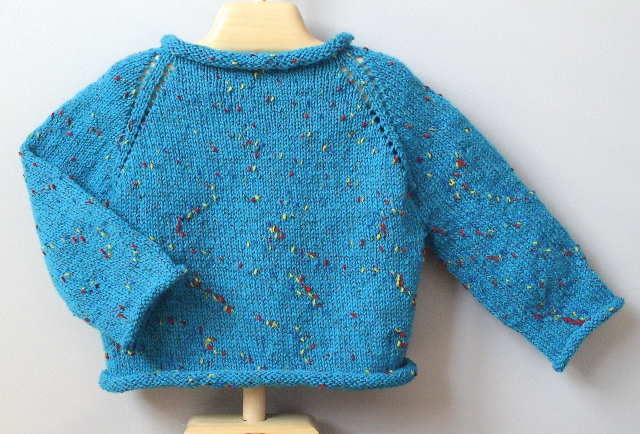
OMG, there is still more. I'm writing the pattern for this classic top down cardigan. I'm calling it the Everyday Cardigan (Rowan Pure worsted wool). I've knit a second one which I have worn quite a bit so my own experience is that it is a sweater to grab any time you walk out the door. It needs buttons but the writing is almost done.

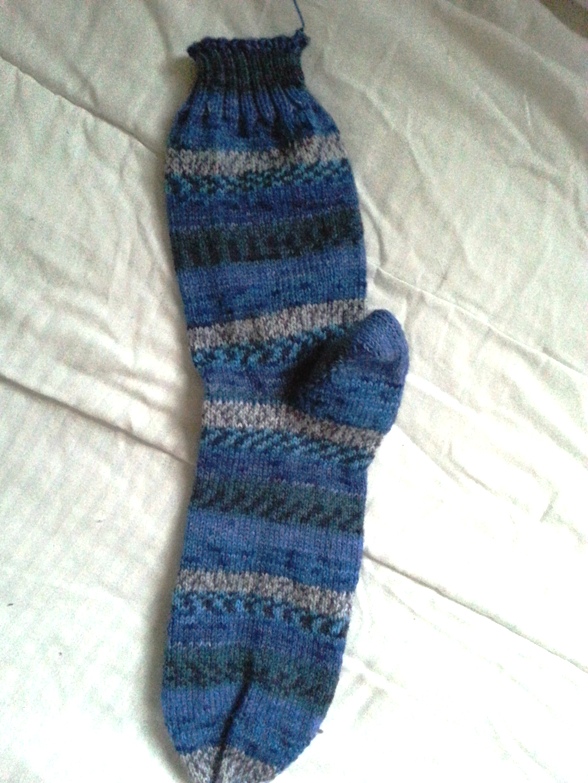
Yup, one more. The ever constant socks I always have on my needles (Comfort by Sockenwolle). No deadline on these because I'll just cast on another pair when I'm done.
 Phew, my knitting plate is overflowing. Something has to get finished!!!! I'm not alone here right? Please tell me I'm not,
Deb

Thursday 21 September 2017

Knitting behind the glass

It's fall now. The season is marked off for us by the beginning of the competitive curling tour. Since our daughter has been competing I have knit many, many garments sitting behind the glass. I began again on Labour Day weekend, a couple of weekends back, knitting the first of the many garments I will knit this year at curling rinks watching Team Flaxey play.

My husband is holding up the Top Down Ridges sweater in a new Cotton Tweed colour, Rose. It's very pretty but not tooo, tooo pink.
Just back from a second weekend of curling spectating. I have a sock in Comfort Sockenwoole going.
and started a hat and scarf in Red, White and Black Norspun. Garter Stitch is easiest in a crowd sitting on bleachers.
Go Team Flaxey.
Deb

Thursday 7 September 2017

Neatening Cast Off GAP

I'm sewing in ends and I have a method to show you that I learned a long time ago which seems to work for me. There is always a gap your cast off edge (and cast on edge too) between the beginning and the end.
It can be closed nicely as you sew in the end.

Begin with the yarn on a needle and held to the back of your work. You can see that my yarn is attached to the Right Side of the gap. Bring the needle through the first stitch on the other side of the gap, from Back to Front.
Now bring the yarn to the back of the work again. Thread the needle through the first side of the gap (in my case the Right side of the gap), from Back to Front. That "Back to Front" part is important.
Now take the yarn and needle to the back of the work again and repeat threading the needle through the stitch on the far side again. Pull the thread snug and see how it looks. I hope it looks great. Mine does.

Thread the end through the wrong side to finish.
By threading the end through from the Back to Front on one side and then from Back to Front on the other side you are making the yarn do a figure 8 with the crossing going into the gap and filling it up. Let me know if you try this. It totally works for me.
Deb

Sewing, ugh.

Not my favourite job - sewing buttons on. But here I am set up with my handy sewing kit ...
which I probably bought in high school, hence the happy face. Although why I don't take it off is question that I can't answer. Maybe it has significance that I have long forgotten.

I'm always amazed when I get to the button sewing part. Can you thread a needle easily? I wear reading glasses, strong ones, and mostly I wave my thread at the needle where I think the hole is because I can't actually see it and it always astonishes me that the thread actually goes through the hole. Not the first time, ha, or the second either but eventually with patience, lots of patience, it all works and I can sew on the buttons.
Success. This is the Top Down Ridges pattern in a lovely new Cotton Tweed colour, Rose.

Would you like to see this as an adult pattern? Would you wear a garter stitch cardigan in DK weight yarn? I'm think that I would.
Deb

Friday 1 September 2017

Getting Ready

It's going to be a busy week. The Kitchener-Waterloo Knitter's Fair is a week Saturday and I'm already awake in the middle of the night trying to think of a good way to do the show. It's one day so set up is critical and needs to be fast. I'm also working the booth solo so I'm trying to make it as easy as possible for people to choose a kit and cash out quickly so I can service everyone as best I can. I also like to have a chance to talk to knitters but there are a couple hours in the middle of the day where this is hard to do.

This year I'm doing a Cabin Fever Kid's booth. All children, all the time.
I'm sorting and kitting up some of the little sweaters now. I feel like I have some sort of handle on this.

My new thought for the knitters is to have a section where you can choose a pattern and then pick up a package of your favourite colour of Cotton Tweed. Pick and choose. These are the sweaters I have choosen to take so far. Have I missed any of your favourites?


I have lots of packages of 2 & 3 balls in a wide assortment of colours. As a shopper I would enjoy doing this. What do you think? A good idea? Would you like to shop this way?

I'd be happy to hear your comments. Setting these shows up is always tricky and I'm thinking this might be a fun way to do it.
Deb