Made some progress on the Hat booklet. Mary, my pattern checker and I have now worked out a system which I am very happy with. I mail her hardcopies of the patterns I want her to look at. She marks them all up with her corrections and then we arrange for a phone call and go over them. This gives me the opportunity to ask her opinion on certain aspects of the work and it also gives me a chance to talk out loud about anything I'm not sure of. I can usually decide then on what I'm going to do.
We discussed whether the brims of the hats should be done with a size smaller needle. Quite often this is done on hats so that the brim hugs the head tightly which is good. But ... it involves another circular needle or set of double points which is another investment for a newish knitter. And hats are quite often a project that a new knitter will tackle. So I decided to go without the smaller needle.
.JPG) In some of the patterns there is a spot where it might say "work 3 garter stitch ridges". All the hats in this booklet are written so that any yarn can be used. So we looked at these patterns and thought about what it would look like if you knit 6 rounds in sock yarn or 6 rounds in chunky yarn. What if you knit 6 rounds on a Newborn hat or a Large Adult hat? How would this affect the look of the hat? Sometimes it did and we changed it to x number of inches measurement, and sometimes it didn't and we left it alone.
In some of the patterns there is a spot where it might say "work 3 garter stitch ridges". All the hats in this booklet are written so that any yarn can be used. So we looked at these patterns and thought about what it would look like if you knit 6 rounds in sock yarn or 6 rounds in chunky yarn. What if you knit 6 rounds on a Newborn hat or a Large Adult hat? How would this affect the look of the hat? Sometimes it did and we changed it to x number of inches measurement, and sometimes it didn't and we left it alone.
.JPG) We will have an abbreviation section at the front of the booklet but we discussed which abbreviations should go with each of the patterns so that anything unusual is there when you need it. We decided that any pattern with an I-Cord needs the explanation there at hand.
We will have an abbreviation section at the front of the booklet but we discussed which abbreviations should go with each of the patterns so that anything unusual is there when you need it. We decided that any pattern with an I-Cord needs the explanation there at hand.
The question I'm still pondering is whether to put the M1 increase abbreviation on the patterns which use it. I have had several calls lately where knitters have used the Kf/b increase (knit into front and back of the same stitch) in the place of the M1 and this throws your stitch count out if it's set up for the M1. Maybe it's not as well known as I had thought.
Quite a good conversation and I will have another list of questions to discuss after the next set of patterns go off to Mary. That's half of the patterns checked. Hooray. I have some more editing to do next week and more test knitting of hats. No more progress on the sock yet but I'll be knitting on it tomorrow.
-Deb
P.S. Commenters: And yes Samm, I am really glad it's not the other way around (see comments on last post).
I think that Valerie, from the comments, is hooked folks. Unless she runs into a real roadblock we have another sock knitter. Yes! It's all part of our plan for knitters to take over the world. Hee, hee.
MommaBear, I am trying to decide which of these samples (with the weird increases) to make into a garment. Or which to do first maybe because I would love to try all of them. Time, where does it go?


 And I think I will rework the toe to a more standard wedge shape.
 But other than that I think it's perfect. Ha, ha.
 Do these look like hats to you? Do they know I have set myself a deadline for the end of the week? The 4 hats I have left to edit and test knit are supposed to get done by then, but no . . .
 Even knitting gi-normous socks for my husband does not faze me, but hats? No way! Does this happen to you? I have been merrily knitting hat, after hat, after hat and then, smack, into the wall. I cannot knit another hat. Not today, not tomorrow. There is another flap cap in the waiting line (with the flap you like, Samm) but I can't make myself do it right now. I think I am going to have to officially extend the deadline to at least the end of the weekend. I cannot face another hat.
 It's up on Patternfish.com, the Squiggle Sock pattern.
.JPG) Meanwhile back at the ranch I have been, you guessed it, still knitting hats. I'm up to the Flap Caps now - there will be two of them. These are more complicated patterns because of the need to situate the flaps but they knit up very well and fit great. Ya gotta love the warm flaps.
Meanwhile back at the ranch I have been, you guessed it, still knitting hats. I'm up to the Flap Caps now - there will be two of them. These are more complicated patterns because of the need to situate the flaps but they knit up very well and fit great. Ya gotta love the warm flaps..JPG) I found that the green didn't work so well here. Not enough definition between the green and the blue. So I substituted white instead. Which lifts the whole colourway and gives the hat a lighter look somehow. This is the very biggest size - 25" around, yikes it's big. But my son could wear this with his winter (big) hair.
I found that the green didn't work so well here. Not enough definition between the green and the blue. So I substituted white instead. Which lifts the whole colourway and gives the hat a lighter look somehow. This is the very biggest size - 25" around, yikes it's big. But my son could wear this with his winter (big) hair..JPG)
 I decided to make the Front measure 1" smaller than the Back (no point in being excessive here). My bust measures 38" around. You have to begin somewhere so let's begin with the idea of making this sweater my exact size of 38" around. Which means the Back of my pullover is going to be 19" wide. And I'm going to make the Front 1" smaller so it will have 18" across (this gives me negative ease, meaning it would end up smaller than me and way, way too tight). But what if I worked some double increases just on the Front to add on an extra 3" to the width.
 The larger holes are where I increased 2
  Hey, it's worth trying. I think this sort of mimics darts in a blouse without any short rows involved. This could work, I'm almost sure of it. I have some fine tuning to do so back to the beginning I go, this time I'm making it in blue I think. Was that fun or what?!
.JPG)
.JPG)
.JPG)
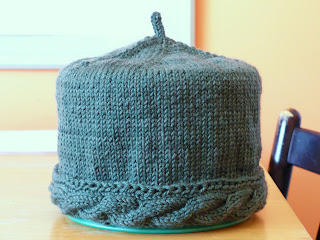
.JPG) Test knit in Shelridge Farm's W4 (
Test knit in Shelridge Farm's W4 (.JPG) The crown is cool.
The crown is cool. And here is the original hat knit for Mary's brand new grandchild. Aah. This one has a rolled brim which will be optional but lovely for babies and girls.
 M1– Make 1 stitch: With Left needle, lift the running thread between the stitch just worked and the next stitch, from front to back, and knit into the back of the resulting loop.
 They are both excellent increases. The Kf/b is easier to work and has a ton of applications. The problem with it is that it is not symmetrical. When you make the second stitch by knitting into the back of the stitch you produce a knit stitch and then a stitch with a bar across it. It's terrific if you are fitting it into ribbing because the second stitch mimics a purl stitch. This barred stitch is always to the left of the knit stitch. When doing increases for a top down garment I prefer the M1 because I don't get that second barred stitch. You can make the M1 stitch symmetrical so that it leans to the right or left.
 It makes a small hole but it's not fiddly because it's just another knit stitch except under the horizontal bar instead of into a stitch on the needle.


 Ahh, correct and lovely.
 I was going to do a traditional heel but now that I am ready to start I think I'm going to work the short row heel. I made these a little longer than I generally do, so to accommodate my calves I went up a needle size for the ribbing and the first 3 tiers of the pattern. I think you can see where it comes in on the sock. They fit really nicely. I will try this on more of my socks in future because these hug my ankles (which are narrow) but sit well on my calves (which are not). It's much easier to change the socks then it is to change me. Ha.
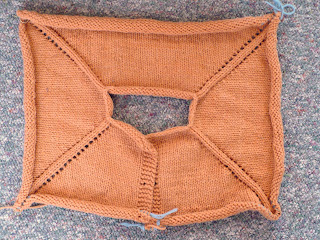
 Now we have a double line of increases on the top of the shoulder with one line of increases on either side of the the Front and Back.
.JPG) The single line of increases at the edge of the Fronts and Back keep the raglan diagonal line in place. But it seems to widen the neckline. The line of increases on top of the shoulder helps the sweater sit really well.
The single line of increases at the edge of the Fronts and Back keep the raglan diagonal line in place. But it seems to widen the neckline. The line of increases on top of the shoulder helps the sweater sit really well. We would have a diamond shaped neckline where all the increase lines are an equal distance apart. I have gone one step further and separated the double line of increases on the top of the shoulder.
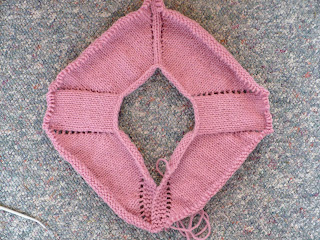 Now I think it mimics a saddle-shoulder (imagine it without the YO increases).
 I could rotate the diamond neckline so that it's square again.
 This gives me a neckline that drops quite a bit at the front because the sleeves start with a lot more stitches at the top of the shoulder.
.JPG) OK, enough? I'm stopping now but there are lots more possibilities. In all of these examples I am still working 8 increases every other row, the same as the first standard raglan set up. So theoretically you could plug any of these into a standard raglan pattern. We talked about sleeve adjustments too.
OK, enough? I'm stopping now but there are lots more possibilities. In all of these examples I am still working 8 increases every other row, the same as the first standard raglan set up. So theoretically you could plug any of these into a standard raglan pattern. We talked about sleeve adjustments too..JPG) The easiest thing to do is to work the increases in the patterns that are set up and when you have enough sleeve stitches just stop increasing on the sleeves and continue on the Body. Here I sped up the Body increasing, after I had stopped the sleeve increases, to increasing 1 stitch on every row (instead of every other row). It wants to dip under the arm. I like that.
The easiest thing to do is to work the increases in the patterns that are set up and when you have enough sleeve stitches just stop increasing on the sleeves and continue on the Body. Here I sped up the Body increasing, after I had stopped the sleeve increases, to increasing 1 stitch on every row (instead of every other row). It wants to dip under the arm. I like that.