Showing posts with label cable. Show all posts

Thursday, 2 March 2017

Cables in-the-round made easier with "tells"

I'm not going to tell you how to make crossing your cables easier, with or without a cable needle. I'm not going to tell you how make your cable stitches neater.

What I want to talk about is how you can make some changes to a cable pattern to make working your cable crossings easier to keep track of. You can put cable "tells" in your pattern so that it can't keep it's poker face on.

Some cable patterns, especially wide ones, are very busy. There might be cable crossings happening somewhere on every right side row. If you're working in the round, you then have a working round where you cross and a comfort round where you knit the knits and purl the purls.

But some patterns have several rounds where no crossings take place. The simple rope cable is a prime example, *work 2 rounds with purls and knits, work a crossing round, work 5 rounds with purls and knits as set; repeat from *. The cable crossing is actually every 8th round.
How can you keep track? You can make ticks on the side of the page but did you make a tick this time or were you distracted as you worked the cable and did you forget? Are you sure?

Since you might be adding this to your top down sweater as a design feature, you get to be the boss of this pattern. So be the boss and make this easier to work. How about making the side stitches in garter stitch instead of all purl stitches. You can now count the garter ridges: 3 ridges showing above the last crossing (Rounds 5, 7 and 1), time to cross again (Round 3).
 A more complicated pattern could be added to. Give yourself something to "tell" you when to cross. Take this double crossed rope cable pattern with purl stitches in between the cables.
What if you added one stitch in the centre and knit it through the back loop every other round (K1tbl).
Now as you approach the pattern panel you can look over to see if that centre stitch is twisted or not. Count the twisted stitches and you know when to cross your cables again. Maybe make the side stitches in garter stitch too? How could you go wrong?!

One more idea. How about adding the "tell" on either side of your cable panel as a border. It won't interfere with the pattern itself but it will give you the needed information. Here I've added the garter stitches outside of the single rope cable pattern.
You are in the designer chair now so swatch and see what you like the look of. Adding "tells" makes your cable knitting experience much more enjoyable. No ticks on the page, no guessing about when to cross your cables. With a little bit of additional designing you can have relaxed, enjoyable cable knit.
-Deb


Monday, 27 February 2017

Place Cable in a Top Down Sweater

You can place a cable panel into a Top Down garment fairly easily. Here are a couple things to consider:

1.  Because cables pull in your fabric you will have to work a set of increase stitches in the round before setting up your pattern or in the first pattern row itself, before the first cable crossing. The rule is approximately 1 stitch increased for every 3 sts of a cable. A 6 stitch cable would need 2 sts increased. A 4 stitch cable would still require an increase of 2 sts. (See previous post: Cables, from Flat to in-the-round.)

2.  This is a Top Down garment. You are knitting this garment upside down.
That means that following the directions for your cable, starting with Row 1 and going to Row 8 say, will mean that Row 1 is just under your neck opening and Row 8 is a ways down the front of your sweater.

A terrific looking Horseshoe cable as you knit it looks like this.

But when you wear it, it appears like this.
Oops, all of the good luck from your horseshoes is leaking out because now your horseshoes are upside down.

So although it will baffle anyone watching you, you need to look through your stitch dictionary with it turned UPSIDE DOWN. In that position you will see what the cable will look like when the sweater is worn. It's fun to do, especially in public.

3.  Of course all the stitches in the cable are also turned upside down. This recent discussion prompted this response from LaurieofNepean: 
"We are all so used to looking at a cable one way (as we knit it) and don’t always consider how different it looks when we turn it upside down. For example, the “v”s are not structured the way our eyes want them to look.
I have come to the conclusion that it’s the symmetry issue that affects many cable patterns when they are worked upside down. Even a 3x3 cable looks different upside down and right side up. So I always swatch before I put any pattern into my top-downs. Then I turn the swatch upside down and look at it carefully to decide if I like the look. This is a fairly recent development in my knitting career. It comes from seeing so many publications where the swatches are obviously photographed upside down and so look funny."

Thanks Laurie. Swatching, yes, great advice. You should definitely take a look at how the cable is going to appear upside down before embarking on a sweater.

Stay tuned for the next post for a couple of tips on "tells" so that your cable can't maintain it's poker face.
Previous Post: Cables, from Flat to in-the-round
Deb

Wednesday, 22 February 2017

Cables, from Flat to Knit in-the-round

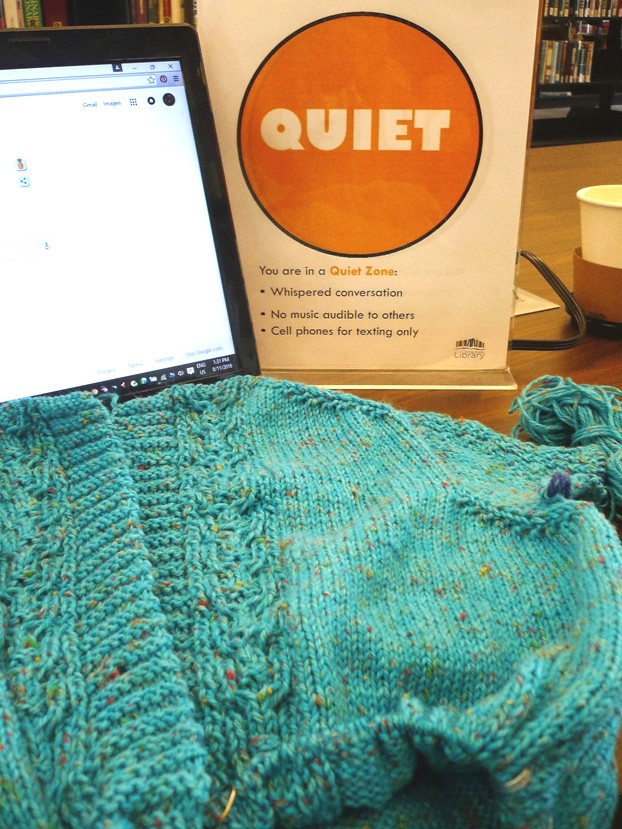
Let's jazz up a knit-in-the-round stockinette sweater by adding a Cable panel. There are many stitch dictionaries to check out various cables.
Here are a couple of things to consider before working in-the-round with a cable pattern:

1.  Most stitch dictionaries are written for flat knitting. There is a right side row where the cable crossing action is and a wrong side row worked back in knits and purls which amounts to "knit the knits and purl the purls".

2.  The symbols used in charts are meant to convey what the pattern will look like on the Right Side of the work. This is a bonus to in-the-round knitting since you are always looking at the Right Side.

A Simple Rope Cable written for flat knitting.

Worked Flat
Row 1, 5 & 7: (RS) P2, K4, P2.
Rows 2, 4, 6 & 8: (WS) K2, P4, K2. (You can see the chart is awkward to read on the wrong side rows. "-" is a knit stitch and the white box is now a purl stitch.)
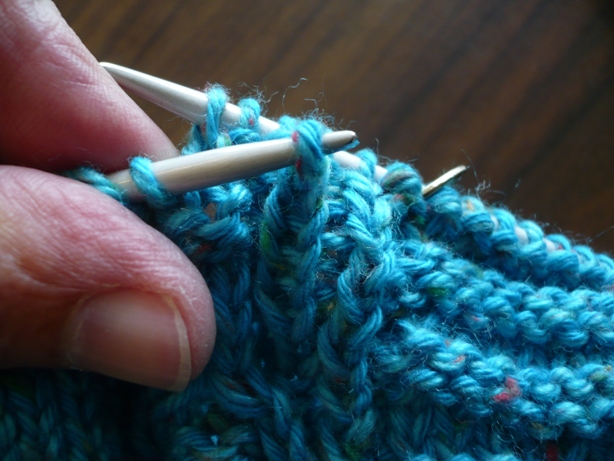
Row 3:  P2, 2x2cross right, P2.


Worked in-the-round (all rounds read from Right to Left)
Rounds 1, 2, 4, 5, 6, 7 & 8: P2, K4, P2.
Round 3:  P2, 2x2cross right, P2.

How easy is that. The in-the-round version has every round exactly the same, except for the cable cross Round 3. You can see how the pattern is going to look on your sweater with those purl stitches at the side. Your knitting will look exactly like the chart.

3.  Cables pull in your fabric. If you are going to do your own designing and place a cable in a stockinette fabric garment you need to compensate for the pull-in or your garment will end up smaller than you want and with a ruffle effect at the top of a panel of cables and again at the bottom.
The rule is to increase 1 stitch for every 3 sts of a cable. This cable is a crossing of 2 over 2, total of 4 sts. I would increase 2 sts for this cable to compensate for the pull-in.

Now, when to work the increases and where?
You have to work the increases before the first cable crossing takes place*. This cable crossing is close to the beginning so I would work the increases as follows:
1.  You can work 2 increases in the knit round before you begin your cable panel. Say you are placing this cable down the centre front of your sweater, over the centre 6 sts work K2, M1(make one stitch), K2, M1, K2. Now you have 8 centre stitches and on the next round you can begin with Round 1 of the cable panel.
2.  You can work the 2 increases into the first round of the Cable Panel itself. This is what I would do. If you are working this cable down the centre front of your garment, work to the centre 6 sts, then I might work P2, M1(make one stitch), K2, M1, P2. Now I have 8 sts and Round 1 completed.
M1: With left needle lift the horizontal bar between the stitch just knit and the next stitch, from front to back, knit into the back of the resulting loop.

*If the first cable crossing is several rounds down the panel you can work the increases in the round before the first crossing takes place.

When you are finished working the desired length for your Cable panel, you have to decrease away the added stitches to get back to your original number of stitches. For this cable decrease 2 sts evenly across the panel so it's back to 6 sts again.

Next: Cables from the Top Down.
Stay tuned,
Deb

Thursday, 5 January 2017

How many UFO projects are in your cupboard?

All of my knitted presents were winners this year. Sometimes it all works out. My daughter wore her hat all day and my son wore his sweater. Yay, scored.

But now it's all over and it's time to face normal life again. That means getting some knitting that has be languishing in the cupboard back out. The trick will be figuring out where I was and what I thought I was doing. I keep saying I'm going to take notes as I knit but that doesn't seem to be happening. No, I'm not making a new year's resolution.

This one is going to the frog pond since I want to do something more with it. Not sure exactly what but I've got a little idea. It's a great colour (but a lousy photo) so say good bye to it. It's going.

This is one I'll finish. It's in Briggs and Little Heritage which will wear like iron once it's done. I wasn't sure about the cable but now that I look at it I think I like it.

And one more that has been on again and off again since the summer. Oh, yeah, I do that too. It's in Turquoise Cotton Tweed so will be great when spring comes around again. Phew, some time on this one. I've even got most of one sleeve done. Wow, that was unexpected.
I'm not quite sure what the collar will become. It may be on speaking terms with me now that it's not squished in a plastic bag.

Oh my god, I have some work to do!! How about you?
Deb

Sunday, 21 August 2016

Cabling Without A Cable Needle, 1 over 3 Cable

I also name this "Knitting Without a Safety Net". You will see why.

This is a Horseshoe Cable formed by two 1 over 3 Cables. The first Cable moves 1 stitch over 3 sts to the Left. The second Cable moves 1 stitch over 3 sts to the Right.

I start with my fingers. First the 1 over 3 CABLE LEFT where the stitch on the right is crossing over and in front of the 3 sts to the left.

That makes the 3 sts on the left the BACKGROUND STS and they are moving to the Right. Now to the actual knitting.

This works best with a sturdy, non-slippery yarn.
Move all the stitches to the tips of the needles. Take the 4 sts involved off the Left needle. YIKES. There they are hanging in mid-air.
With the Right needle, pick up the 3 Background sts. (I always pick up the Background sts first.)
 With Left needle, pick up the 1 stitch that is going to cross over in front.

Now slip the 3 Background sts back onto the Left needle. You can see the cross now.
Knit the 4 sts. Ta-Da. 1 over 3 cross Left is made.

Now for the other side of the Horseshoe Cable. The 1 over 3 Cross Right.
First the fingers.

Background sts will be moving to the Left.

Take the 4 sts off the Left needle
Pick up the 3 Background sts onto Left needle.
Pick up the 1 front stitch which will be crossing to the right with the Right needle.
Slip that 1 stitch onto Left needle and knit 4 sts.

Ta-Da. One Horseshoe Cable made with two 1 over 3 Cables Done.

You are now free to knit without a cable needle, if you dare!
-Deb


Thursday, 11 August 2016

Cold Spot

Here I am taking advantage of a public a/c cold spot.
Shhh, read this post very quietly so that you don't disturb the other computer people in the library. I'm trying to knit very quietly. Although I think the typing at the next table is probably louder.
I'm just finishing up my second ball of Cotton Tweed Turquoise and it's looking like a sweater. I did decide to put the stitch pattern down the sides. I never feel like I'm getting anywhere if there is too much stockinette stitch, especially on an adult sweater.
Now I'm working the same pattern 4 different places as I work across my row. It always surprises me every time I get to the cable crossing row. Wow, already? Yes, 8 more rows done. I'm feeling like I'm really moving along.

Do you use a cable needle? I never do. I don't even own one any more. Lost them all and decided to do without. I'll take some photos and maybe you'll also be convinced to try knitting without a safety net. Yes, it's scary, very scary!
-Deb