
I have discovered, on reflection, that if I am speaking or doing a workshop I do not think of pulling out my camera. Other things on my mind, obviously. If I am participating I can think of the blog and photographs.
Friday I went to Sudbury to be a participant in the Sticks, String and Stewardship knitting retreat. It's based on spirituality and charity knitting. Guest speaker Gailand MacQueen spoke on how needlework reflects your life. He has written a book on labyrinths and mazes so later we walked the labyrinth in Sudbury at sunset with candles, a cool thing to do.  They collected quite a bit of yarn to be knit up for various charities and several blankets, in the middle of the table, for the Blanket Linus project.
And we did some knitting. I picked the Moebius Scarf class and knit a small neck warmer for myself. I understand that winter is coming, again!
 Here it is on a vase, since I couldn't take a photo of it on my neck. It is so dark inside, raining like crazy today.
 Terry-Lynne brought a sock knitting machine, circa 194..., which she was given and has working really well, it's amazing.
 (It's painted red inside.) She can churn out tube socks with ribbed tops. The heel seems to be the sticking point. It's the same for hand knitters and the sock knitting machine - that blasted heel! And speaking of amazing things you can learn about, we started the weekend with the cutting of Sharon's knitting cake.
 AMAZING and delicious too!
They collected quite a bit of yarn to be knit up for various charities and several blankets, in the middle of the table, for the Blanket Linus project.And we did some knitting.
I picked the Moebius Scarf class and knit a small neck warmer for myself. I understand that winter is coming, again!Here it is on a vase, since I couldn't take a photo of it on my neck. It is so dark inside, raining like crazy today.Terry-Lynne brought a sock knitting machine, circa 194..., which she was given and has working really well, it's amazing.(It's painted red inside.) She can churn out tube socks with ribbed tops. The heel seems to be the sticking point. It's the same for hand knitters and the sock knitting machine - that blasted heel! And speaking of amazing things you can learn about, we started the weekend with the cutting of Sharon's knitting cake.AMAZING and delicious too!-Deb
 The Ripples (
 That's the collar of the Swing Coat (
 Cast on 4 sts at the end of the row. Use the 'knitted cast on', you need to turn your work so that the wrong side of the Back is facing you to cast on these 4 sts.
  Starting with the cast on stitches work: With yarn in back Slip 1 stitch, bring yarn to front and Purl 1 st, with yarn in back Slip 1 st, with yarn in front P2tog. Every time you work the P2tog you have cast off 1 stitch.
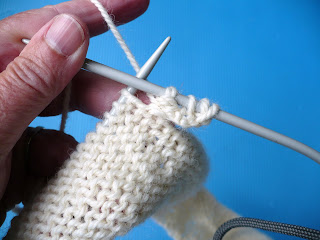
 TURN, again, wrong side of work is facing you and work: with yarn in back SL1, p1, with yarn in back SL1, P2tog. You have now cast off 2 sts.
  It will start to look like this. The edging covers the cast off stitches.
  Work:
Work: Purl across Back to end of row.
  Cast On 4 sts at end of row.
  Starting with the right side of the Back facing you. Repeat the rows above until you have cast off 6 sts. End after ROW 1 and knit across to the last 4 sts, wyib SL1, P1, wyib SL1, P1 (edging). That takes you to the end of the row.
 TURN and beginning with the wrong side facing, repeat Rows 1 & 2 until you have cast off the next set of cast offs - in my case I cast off 4 sts.
 You can do this several times for a stepped cast off for the underarm shaping. Here I have cast off 6 sts on both sides of the Back, then 4 sts on both sides, and finally 3 sts on both sides.
 Once the shaping is done you work the edges up the side of the armhole by working:
 After you finish the Back up to the shoulder, work the same on the Front.


 Plain sailing from here on in.
  I cast on one more project, a sample knit of the Ripples top
  The ripples are beginning to show already.
 The pattern is written and this is the interim photo, taken in my front yard. Both the red and blue versions are going to our photographer for the official photo but if you can't wait there are patterns printed with this photo, ready to go.
 The button placement is set up so that you could button it all the way up and the collar would flip over in a turtleneck with the buttons showing. It's a terrific jacket, designed by Bernice Vollick (
 I cast on a gray sock. I love this colour. We've been playing with dyeing techniques so this is one I need to knit up to see how it looks. Just a plain sock I can take around with me everywhere. All the other projects I have to pay attention to, good to have one plain knit available.
.JPG) I'm almost there. Mine has a few, I think that's 10, buttons to sew on. I have to polish up the pattern and then it's ready for the Kitchener-Waterloo Knitters Fair in Kitchener on Saturday. A really big show.
I'm almost there. Mine has a few, I think that's 10, buttons to sew on. I have to polish up the pattern and then it's ready for the Kitchener-Waterloo Knitters Fair in Kitchener on Saturday. A really big show..JPG) And then I can give in to all the startitis I want and you know I want to.
And then I can give in to all the startitis I want and you know I want to.
