
I didn't make this up, it's from The Sweater Workshop book (first edition) by Jacqueline Fee. It really works well and I don't see it used very often. It can be applied to any vest or shell because you add the 4 sts for the edging onto the garment. It doesn't interfer with the pattern on the vest or shell.
So here goes:
Pretend this is a whole lower body of a shell or vest. I have put the Front sts on a spare piece of red yarn. The Back is on the needle and that is where we are going to start. Cast on 4 sts at the end of the row. Use the 'knitted cast on', you need to turn your work so that the wrong side of the Back is facing you to cast on these 4 sts.
  Starting with the cast on stitches work: With yarn in back Slip 1 stitch, bring yarn to front and Purl 1 st, with yarn in back Slip 1 st, with yarn in front P2tog. Every time you work the P2tog you have cast off 1 stitch.
 TURN, again, wrong side of work is facing you and work: with yarn in back SL1, p1, with yarn in back SL1, P2tog. You have now cast off 2 sts.
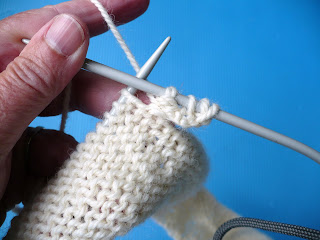
  It will start to look like this. The edging covers the cast off stitches.
  Work:
Work:
Row1: With yarn in back (wyib) SL1, P1, SL1, P2tog, TURN.
Row 2: wyib SL1, P1, wyib SL1, P1.
Repeat last 2 rows until 6 sts have been cast off. End after working Row 1.  Purl across Back to end of row.
  Cast On 4 sts at end of row.
  Starting with the right side of the Back facing you. Repeat the rows above until you have cast off 6 sts. End after ROW 1 and knit across to the last 4 sts, wyib SL1, P1, wyib SL1, P1 (edging). That takes you to the end of the row.
 TURN and beginning with the wrong side facing, repeat Rows 1 & 2 until you have cast off the next set of cast offs - in my case I cast off 4 sts.
I put a pin in between the 2 sets of cast offs - cast off of 6 sts, then cast off of 4 sts. End with Row 1 and knit across to last 4 sts of row, wyib SL1, P1, wyib SL1, P1.  You can do this several times for a stepped cast off for the underarm shaping. Here I have cast off 6 sts on both sides of the Back, then 4 sts on both sides, and finally 3 sts on both sides.
 Once the shaping is done you work the edges up the side of the armhole by working:
Row: Wyib Sl1, P1, wyib SL1, P1, knit or purl to last 4 sts, wyib SL1, P1, wyib SL1, P1.
Repeat.
The edging works up the side of the armhole.
 After you finish the Back up to the shoulder, work the same on the Front.
I love this edging. It means you don't have to pick up stitches around your armhole and work an edge afterwards. It pulls up because of the slipped stitches and never sags. Thanks Jacqueline Fee.
-Deb

Fantastic lesson. I've seen this edge treatment on your summer sweaters and admired it. Jacqueline Fee's book is so useful!
ReplyDelete