Showing posts with label Need An Accessory?. Show all posts

Friday, 11 July 2014

No Swatch Needed - Any Gauge

I know, and in your heart you know, that we should all be swatching for every project but sometimes it's great to jump into a project without this first step. Choosing the right project will ensure a good outcome.

Several years ago I gave a talk at a local spinning guild and the comment was made several times that spinners are not always able to make yarn in commercial gauges. So knitting up their homespun becomes a challenge. To respond to this, I went home and wrote up The Gaugeless Hat. (Check out these patterns on our Cabin Fever site if it's easier than the links I've included.)
It starts by casting on for the I-Cord tail at the top. As you work the stripes, the hat gets bigger and bigger. When it's long enough you then check your gauge, measure the head of the wearer, do a simple multiplication to find the number of stitches needed for the body of the hat and work the number of increases needed to get the correct number of stitches for the size of hat you want. It works with any yarn. It's fun and easy and we've been sent some wild looking hats made from this pattern. Fun yarns definitely figure largely in these spectacular hats.

So a hat, knit from the top down works great.

Also bags work. They don't have to fit anyone! They are large hats with handles, aren't they? They're fun and fast to knit. You can felt them, use any weight of wool you like, put patterns in or knit them plain. I use the Felted Satchel every week. It holds my bank deposit books very nicely.
Our favourite two bags are the Sheepstring Big Bag
 and the Fairisle Tote which is fantastic size for knitting projects.
Our newest bags are in the Need An Accessory book. I'm really happy with the straps on these bags. They don't stretch, yay. This is the latest one I've knit. I have several more in my future. I think they make great gifts.
You can knit swatchless without feeling guilty!
Happy Swatchless knitting,
Deb
For printed copies of any of these patterns email us: info@cabinfever.ca

Thursday, 29 May 2014

Swatches can Lie!

Oh, no. This is terrible. Swatches can lie. Not for everyone but maybe for you and definitely for me. If you find that lots of your garments are bigger or smaller than you thought they would be, read on.

When you knit a swatch are you very careful? Are you looking at every stitch, knitting slower than usual? Are all your stitches perfectly formed and looking beautiful. Do you knit a large swatch? What happens when you knit while chatting with a friend, or as your mind wanders, or while watching TV?

You got it. Your gauge can change. When I teach classes I have the knitters work a swatch, cast on for their sweater and work several inches of their top down sweater. Then we check the gauge again. In every class, one third of the knitters have found that their gauge has shifted. Usually they have loosened up and every once in a while someone has tighten up.

What to do?!
1.  Rip back and start again with smaller or larger needles to get the correct gauge. I think we've all done this one.

2.  Continue on and work to a smaller or larger size to compensate for the gauge shift.

3.  For knitters working out of one of the Cabin Fever multi-gauge books there is a good solution. Continue to work with your New gauge and change to a new set of stitch numbers that correspond to your New gauge.

There's a very good reason I write these books. I don't get gauge and, I admit it, my gauge changes.

Say I started out working 20 sts = 4" (same as 5 sts = 1") according to my swatch. Now I'm 4" down my top down sweater and I discover that I'm really working at 18 sts = 4" (4.5 sts = 1"). Yikes, my sweater is going to be too big. At this point I can continue knitting and working my raglan increases as usual, towards the stitch numbers for the Bottom of the Yoke. But now I'm going to work to the stitch numbers for my New gauge instead of my original gauge (especially the Back) so that my sweater will fit.

The top chart is the number of stitches for the Bottom of Yoke for my size, assuming I'm working at 20 sts = 4" gauge (top chart). At the Bottom of the Yoke, in my original gauge, I want to knit until my Front has 44 sts, Sleeve has 60 sts and Back has 88 sts. BUT my gauge has shifted to 18 sts = 4". So I'm going to move to the line of stitch numbers for my New gauge (see shaded line on bottom chart).
Now, working in my New gauge, I'm going to work until my Back is 78 sts (instead of 88 sts at original gauge). This will ensure that my Back, and therefore my Front, will fit for my size at the New gauge which I will maintain for the rest of my sweater. I'm knitting at a looser gauge than originally planned, so I will work my Back and Front with less stitches to get my size.

This works for many, many knitters. It saves the stress of ripping out or recalculating all your numbers. Just shift to a new line of stitch numbers that correspond to the gauge you are now knitting.

Your swatches may be wonderfully truthful. You may get gauge and maintain it. I hope you do. But if you don't, these multi-gauge books have an added advantage for you.

These numbers are out of one of the Need A ... series of Multi-gauge books by Cabin Fever. http://www.cabinfever.ca/knittersbooks.html ;

Questions? I'm sure you have some.
-Deb

 Thanks for your comments. I really appreciate hearing from you.


Friday, 7 March 2014

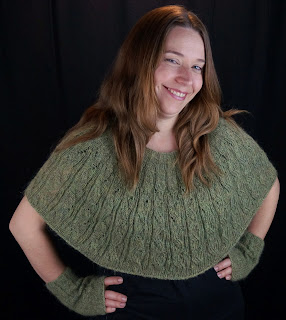
I am knitting again, YAY. Sometimes I have to have a bit of a break but it's good to be back. But what to knit? Winter is almost over hopefully (?!) but summer still seems a long way away. So it seems a good time of year to be knitting a top down capelet. Although maybe there isn't a bad time of year for these garments. Especially when I think of how cozy they are. Not a whole sweater but enough to keep the chill off my shoulders and it stays exactly where I put it (that's a reference to shawls which I feel I need to staple to my body).
Lyn and I have put our heads together and come up with a new Cabin Fever wool. It's dyed by Shelridge Yarns (that's Lyn). We're calling it Star Dust. It's worsted weight W4 (my fav) and is just lovely to knit with. This capelet knit up in no time at all. It's from the Need An Accessory? book with the cable pattern. Now I could make mittlets with the same cable pattern. I would look stylish and cozy (or not, ha, ha).
-Deb

Tuesday, 17 December 2013

I-CORD THUMB

I couldn't make a video. Somehow what I needed wasn't coming up on my computer today (or lots of other days, it's just me). So here's the I-Cord Thumb in pictures. The instructions for this mitten and the Alternative Thumb are in the Need An Accessory? book

Knit your mitten as usual, putting the thumb stitches on spare yarn.
When you're ready to do the thumb put all the stitches on ONE double pointed needle. (Tip: If there are really loose stands beside the needle stitches, pick one strand up, twist it and put on needle.) Knit across the stitches.
Now SLIDE the stitches to the other end of the needle. Yarn from the ball is now attached to the last stitch on the needle. Pull the yarn across the back of all the stitches and Knit the first stitch. Knit across all the stitches on the needle. You can see the ladder that makes. All is well.
Again, *Slide the stitches to the other end of the needle, pull the yarn across the back of the stitches and Knit all the stitches; repeat from * for the length of your thumb. Work a couple rounds of K2tog to decrease the top of the thumb. You'll have a lot of ladders going up the inside of the thumb. Wonderful.
Now, get out your crochet hook and let the magic begin. With the crochet hook, pick up a leg of a stitch at the base of the thumb (this is a stitch in the fabric of the palm).
Pull the first ladder through this stitch. 
Hook up each ladder, one by one up the thumb.
Put the last loop onto the needle. Using a sewing up needle, thread the yarn through all the thumb stitches and pull tight. Sew in end. Use the end at the base of the thumb to tidy up the little hole.
Ta, da, ladders are gone. Thumb is finished. This photo has NOT been doctored!!

That's how easy it is. You can knit a thumb in minutes. Try it.
-Deb
P.S. Sharon in Surrey, Lazy, ha, ha! You have so many socks on the go. I just finished 2 pair this week. Now only 2 toques to knit. Good luck with the knee warmers.

Thursday, 31 October 2013

It's mitten wearing weather now for us here in Canada.  The knitters in the Need An Accessory? book mitten class , last Saturday at Yarn Forward and Sew On in Ottawa, got a head start on their pair. As you can see, the yarn weights ranged from DK to bulky weight and everyone got one mitten done and started the second one. And lots had cables running up the back.
I've been wearing my own pair and am knitting a fingering weight pair to put inside when it gets really cold. I'm ready winter, bring it on!
 - Deb

Wednesday, 16 October 2013

Not Written in Stone

Knitting patterns are not written in stone. They are there for you to play with, really it's true. If you need permission, you have it from me. Please, please do whatever you want with any of the Cabin Fever patterns. Have fun. Take a chance. Each time you make a little or big change you make that project your own creation. Take a step away from a pattern and see where you end up.
Right now I seem to have a thing about making bags. I'm knitting myself one out of the Need An Accessory? book in two colours.
To make it easier for myself, I made a small change to the original stitch pattern from the book as worked in this cowl.
For this bag, I worked garter stitch instead of purl stitches between the cables. I was knitting and watching curling over the weekend (my daughter's team WON, yay) and with all the excitement and sitting on the edge of my chair, I knew I would find it difficult to keep track of the cable crossings. Changing every other round to a simple knit round meant I would cross my cables on every 4th garter stitch ridge (every 8 rounds). So far it's working out really well and it's going to make a really great bag.
I had fun over the summer knitting Harriet's Jacket by Elizabeth McCarten. This is a garter stitch project where, for the jacket, you cast on at the sleeve cuff and knit up the sleeve and then work half the jacket to the Front edge and the centre Back, attaching both halves at the centre Back. I cast on at the end of the sleeve and carried on from there. I guess I knit Harriet's Vest. Once the buttons are sewn on I'll be wearing this a lot. It fits great.
Have you made little or big changes to a pattern? Did you enjoy it? Will you continue to do so?
-Deb

Friday, 5 July 2013

Need An Accessory?

As you've seen ,we've been knitting lots of small accessories. And now, ta da, the Need An Accessory? book is ready. YAY!! It's available as a pdf download on the patternfish site: Need An Accessory?. The mobile version will be up soon and as we speak, the printer is busy printing hard copies.
Each of these accessories is knit "in the round" can be knit in any gauge from sock weight to chunky weight yarn. Use something in your stash or go to your local yarn store and pick your favourite colour and get knitting. Knit a mittlet, mitten, cowl, infinity scarf, hat, bag or capelet. Make a set of several garments by transferring one of the 10 Stitch Patterns onto the garment pattern page you want to make. Small projects are great to knit in the summer.
-Deb
P.S. Rust tops the votes on the 3 new colours. And the denim gets a vote too. I think they are both keepers. Thanks for your comments.

Monday, 10 June 2013

Lyn and I spent the weekend at camp (a cottage, to southern folks) working on the Accessory Book. It's amazing how much work needs to be done at the end. We were trying to be adjust words to be consistent with the instructions. We added in some black & white photos. Today we moved pages around so you won't have to flip pages to find the stitch patterns when you want them. Also we check and recheck that all the information you need is there where you need it. I think we are very close to being ready to let it go. One more edit on Thursday and then it goes to the printer so they can do the proofs. Still several weeks away from publication.
Some last minute knits had to be done. Lyn knit a cowl on the drive up and I knit another mitten on the way back home. We'll need new photos of them.

I did have a bit of time to knit on my sweater.
I'm ready to do the waist shaping now. It's really comfortable to wear even as it is. Can't wait to get a little more done. That's Lake Huron in the background.
-Deb


Saturday, 1 June 2013

We're in book production now. Lyn is converting the entire contents of the book into a printer ready copy. I've been over it with my tech editor and have some correction work to do on the new copy. As you might imagine, the wording across the entire book is not consistent since it was written over the last 6 months, bit by bit. Then as test knitting came in, further changes were made. Now it has to come together as one book. It's really difficult to edit my own writing since I don't really see what's on the page but all that has gone on behind it. To read a pattern as if it's not your own takes putting yourself in someone else's head and reading it from their point of view. It makes a huge difference if it can be done throughout the whole book. That's my task over the next week.


-Deb

Monday, 27 May 2013

This week is photography week for the Need An Accessory book. Here's a little sneak preview of some preliminary shots.

Lots more work to be done yet.
Deb

Friday, 17 May 2013

Finished the bag. I really found working the slip stitch pattern a breeze. Worked most of it in the car. And working with only one colour every 2 rounds makes the knitting very easy. A good colour burst with no complications.
This stitch can also accommodate really bright colours. I'm very happy with the orange which can sometimes overwhelm a garment. This bag can take it!
The handle is worked by picking up stitches from the cast on edge at the top. It's worked like a large buttonhole, cast off stitches in one round and cast on more stitches on the next round. Then work for 1" and Cast Off. The Cast off is going to keep it from stretching because as we all know, a tight cast off will not move at all. One more garment, can we call them garments(?), finished for the Accessory Book. Now to finish the matching mittens.
-Deb

Wednesday, 15 May 2013

Counting down to the end of our Need An Accessory book, due out in July. My goal today is to finish a tote bag I'm working on and the matching mittens. Rather a flamboyant colourway, orange and blue in a slip stitch pattern working only one colour each row. I'm really liking it, bright colours make me smile.
- Deb

Thursday, 4 April 2013

Pat did a different pattern on the Chunky Mittlets.
I really like them.

A suggestion that was made to me was to take the YO that sits at the end of your double pointed needle and move it in one stitch. Terry pointed out that if you put the mittlet down and pick it up again you could loose the YO. It turns out the moving it one stitch in also makes the increase tighter.
I've incorporated it into the pattern. Sometimes it's the small details that make the difference in a pattern. Thanks Terry.
-Deb

Tuesday, 26 March 2013

This Top Down has a squarer neckline than a standard raglan,though not perfectly square. The back of the neck is 7" wide and the cast on for the sleeves is 4" wide. A more standard sleeve width would be 1"-2" wide. This changes the neckline, making it a wider rectangle and gives a nice drop to the front and back of the neckline without any fancy short row shaping.
The stripes are continuing. I'm finding that this is a cheerful knit. I smile while I'm knitting.

More Mittlets. Terry came to our Mariposa knit club this morning with her version of the mittlets.
She worked a lace pattern down the back of the hand in two different yarns, as you can see. But she went a litte further . . .
and ran the lace pattern up the thumb. Nice, very nice. All that from a plain mittlet pattern in stockinette stitch. A great idea.
- deb

Monday, 11 March 2013

I got some wonderful feedback on the mittlets (2 posts back) and the Challenge. The increase didn't cause anyone any problems, phew. The Challenge was to make up a 8-stitch pattern for the back of the mittlets to see how they would turn out.

Miss Mouse (teal pair) made a plain pair to check out the increase. 

Brenda (brown pair) put a rope cable of her own on the Back.

Bernice made up her own knit/purl pattern for the back of her mitten.
 
I think there are a couple more coming. Bring them on. I'm looking forward to seeing them. THANKS for joining in. I really appreciate the feedback.
-Deb

Thursday, 7 March 2013

I'm working on my class for the YarnOver SleepOver Retreat, April 12-14. The idea is similar to the Challenge in the last post and the talk I did at the Kawartha knitting guild. There is a theme here that I've been working on.

A Basic pattern, and we all have some in our libraries, has a lot of possibilities that you can't see in the photo. If you can take a step away from the written pattern, just a tiny step, there are many options available to you from every Basic pattern you own. What do you see here?
Small projects with acres and acres of stockinette stitch. What could we do with all those stitches? Could we put a cable in there, a texture pattern, maybe some lace, how about a stitch pattern you make up yourself? We'll talk about what we might do, how we could do it and have some fun thinking up as many wild and crazy ways to decorate as we can. It's sounding like a good time to me.
-Deb
 
If you're interested in a weekend away and can join us, here's the info YarnOver SleepOver Retreat . I can't wait to see what we come up with.

Monday, 4 March 2013

This is a mittlet pattern I'm going to put in the Accessory Book we're working on now. There are instructions for both versions: a Basic (stockinette stitch mittlet) or a Patterned mittlet (with a pattern up the centre back). Would you like to try it out and tell me what you think of it? In the book it will be in many gauges but for now it's really quick to knit in chunky weight yarn.
It has an interesting increase which you may or may not like, let me know. You could substitute the easier Kf/b increase if it's a problem.
And if you can catch any errors please let me know. (If you print this off it's about 6 pages but watch that you don't continue to print the 5 posts that follow it, that's a lot of paper.)

CHALLENGE: The challenge I gave the Kawartha Hooks and Needles Guild was to make up their own 8-stitch pattern. Have a go. There's an empty chart at the bottom. You can make your stitch pattern any number of rows high. Send me a photo of the mittlet with your own stitch pattern on it. I'd love to post them.

I'm going to take this down on March 11.
 

ERGONOMIC MITTLETS
For Adult with CHUNKY YARN
Designed by Deb Gemmell

Pattern will be available on Patternfish in April, 2013.

Monday, 11 February 2013

I am playing with mittens again. I need to knit quite a few to get the pattern writing details down. One detail I spotted on these is that it's necessary to specify which yarn to use for the decreases at the top of the mitten. I think the decrease stitches should all be in the solid purple colour (see the bottom mitten - one set of decrease sts are in variegated blue and the other side is in solid purple).
Details, details.
I am enjoying the small project colourwork. Do you do colour work? Do you do big projects or small things? Do you knit with a colour in each hand? I'm finding the variegated/solid colour combo gives a big impact.
Deb