Top Down Raglan sweaters are infinitely adjustable. An often neglected part of the sweater are the sleeves and sleeves seem to be one of the important parts of a garment that quite a few knitters need to adjust. It's quite simple on a Raglan Top Down to make your sleeves bigger or smaller than the pattern is going to give you for your size.
I learned quite a few new things through working on the
Need A Plus Cardigan book and the
Need A Circular Yoke book. Here's one important fact: your actual bust measurement (taken with a tape measure) doesn't necessarily indicate the size of your arms. If you have a large bust it does not automatically follow that you have large arms and vice versa. Wow, big news.
This means it's important to check your measurements against the pattern schematic.
Measure your actual bust and your actual upper arm with a tape measure.
Then add the amount of ease to the bust measurement you like (standard bust ease would be 3"/8cm).
Add approximately half that ease to your arm (1 1/2"/4cm). The amount of ease you like totally depends on personal preference of course. Maybe you like tight sleeves or extra loose sleeves. Measure the sleeves of some sweaters that you wear. I bet you'll find a wide range of sleeve width.
Find your closest Finished Size on this schematic and see if the sleeve is going to be the correct finished size for you.
Example: actual bust measurement 39" + 3" of ease = 42" finished body
actual arm measurement 13" + 2" of ease = 15" finished sleeve (I like 2" of sleeve ease on a cardigan.)
I would knit the 41" sweater because it's the closest size. But I want a 15" sleeve (my personal preference). The stitch numbers in this pattern will only give me a 14" sleeve. What to do?!
The place to make an adjustment is as you approach the bottom of the yoke. No one will see any adjustment you make here. Begin the pattern from the Top as written and then when you are closer to the bottom of the yoke, begin to think of your sleeves as separate parts of your garment. How would you like them to fit
compared to the schematic. Would your ideal sleeve be a little bigger or a little smaller than the sleeve the pattern is going to give you.
Bigger Sleeve: Let's say I want the sleeve to be 1" bigger than this pattern is going to give me. For my gauge, say I need 6 more stitches (even number) on the sleeve. I work the yoke as written until I have
6 LESS stitches on my sleeve than the pattern says I should have at the bottom of the yoke. (This also totally works if you need the sleeve to be bigger by more than 1". Really it does.)
Bottom of Yoke before Divide Row: the pattern says I should have 56 sts on sleeve.
I'm going to stop when I have 50 sts (56 - 6 = 50 sts)
Now I'm going to
work an extra increase right beside the regular Raglan increase, on both sides of my sleeve and work the regular Raglan increases on the Fronts and Back as written, to the bottom of the yoke.
On my sleeve: slip Marker, K1, work the regular Raglan YO increase, K1, work M1L (extra increase), work to 2 stitches before the Raglan Marker on the far side of sleeve, work M1R, K1, work regular Raglan increase, K1, slip Marker. You have increased 4 stitches on the sleeve in this row, the 2 regular Raglan increases + 2 extra increases. Repeat this until you have 6 extra stitches on the sleeve, 3 extra sts on each side of the sleeve. (56 + 6 = 62 sts on sleeve). Ta, da, an extra inch added to my sleeves.
M1L: increase of 1 stitch: With Left needle, lift the running thread between the stitch just knit and the next stitch, from front to back and knit into the back of the resulting loop.
M1R: increase of 1 stitch: With Left needle, lift the running thread between the stitch just knit and the next stitch, from back to front and knit into the front of the resulting loop.
Here's a little sample I knit with YO increases and extra M1 increases beside them. You can hardly see those extra increases!
But let's say the sleeve as written will be too big for you. What then. This is even easier!
Smaller Sleeve: If you need your sleeve to be 1" smaller, then when you have 1" LESS stitches on your sleeve than the pattern calls for at the bottom of the yoke, you just STOP INCREASING on the sleeve. Yes, just stop. As easy as that. Continue to work the regular Raglan increases on the Fronts and Back. (This also works for knitters who need a sleeve several inches smaller.)
Example: 1" smaller sleeve: At bottom of yoke the pattern calls for 56 sts in my sleeve. I'm going to work the yoke as usual until I have
6 sts LESS (1" worth of stitches in my gauge, even number) on my sleeve. Then I'm going to
stop increasing on my sleeves as I continue to work the regular Raglan increases on the Fronts and Back, to the bottom of the yoke.
Bottom of Yoke Before Divide Row: Pattern calls for 56 sts on sleeve.
I'm going to stop at 50 sts (56 - 6 = 50 sts). That will give me a sleeve that's 1" smaller than schematic.
Now continue to work increases on Fronts and Back and simply knit across the sleeve stitches. I suggest putting a safety pin in the fabric of your sleeves at either edge to remind yourself that you are only working across sleeve stitches without any further increases. It's easy to continue on autopilot and forget. Experience speaking here.
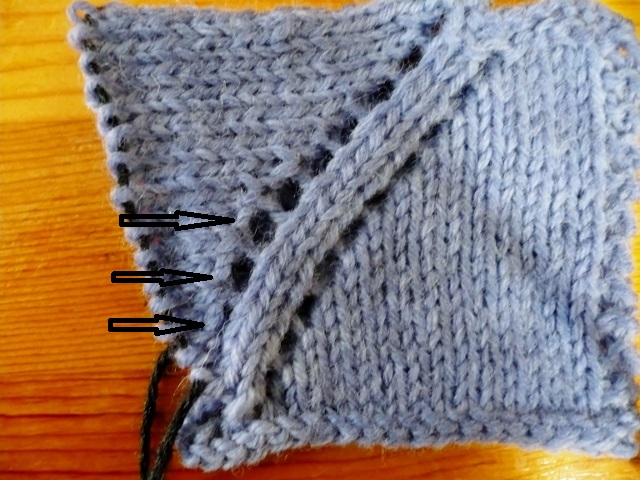
I stopped increasing on the sleeve 4 stitches before the bottom of this yoke and continued the YO increases on the body. The sleeve takes a dive into the underarm which is a great advantage.
I know, I know, some numbers are involved but not many. Have you tried making this adjustment? How did it work for you?
A good fitting sleeve will make all the difference to how your sweater fits.
More FIT blogs: Go to
Where is My Waist. ; Go to
Ease, how much?
-Deb