Showing posts with label tutorial. Show all posts

Thursday, 30 March 2017

open M1 increase

Make one increases (M1) are very popular increases. They are worked using the horizontal bar between stitches to create an extra stitch.

My favourite one is what I call an openMake1 (oM1). I use it for raglan increases on my Top Down sweaters for several reasons:
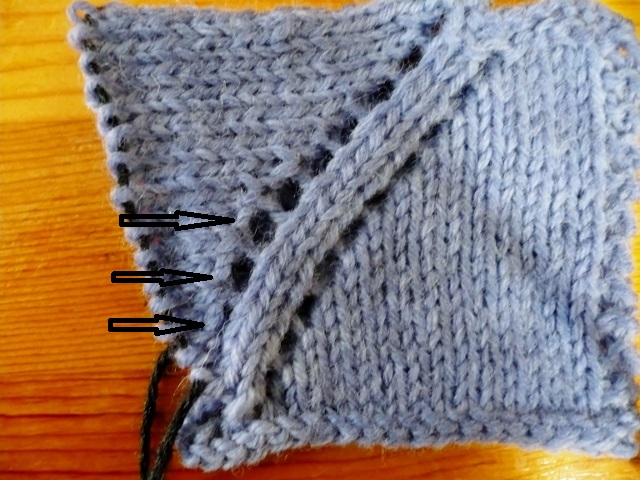
1.  It makes a small hole (smaller than a YO).
2.  It doesn't lean to the right or left which means I can use the same increase before and after my raglan markers.
3.  Working it doesn't interrupt my knitting flow.
4.  You can read whether you have worked the increase or not.

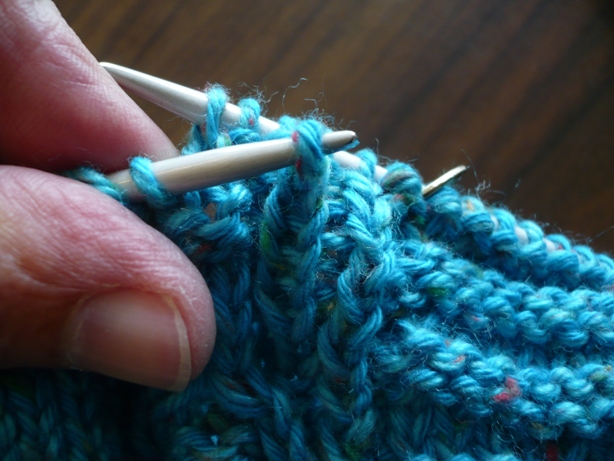
Work an OpenM1 by inserting your Right needle from front to back, under the horizontal bar between the stitch just knit and the next stitch,
 wrap the yarn as usual to knit a stitch and pull back through. This is just like a pick up and knit.

The beauty of it is that it is just one more knit stitch in your round which you work under the horizontal bar instead of in a stitch on your needle. There's nothing more to it than that. Can you wonder that it's a favourite increase?

The trick when knitting a Top Down Pullover is to recognize, as you approach the raglan marker, whether you have worked an increase or not. A in-the-round pullover is worked with one round where the increases are worked and the next round where you usually knit. If your mind wonders like mine does, you can't always remember what round you are working on when you come to a marker. Do I need to increase or is this a knit round?

When you work the oM1 you use up the horizontal bar between stitches. It's now a stitch. So if you see this, you have worked the increase in the last round. There is no horizontal bar there.

This indicates that you are on a Knit Round. You would knit past this spot and continue knitting your round. Next time you come to this marker (in the next round), you will see a horizontal bar.
Then you work the oM1 under that horizontal bar because it's there.

In a nutshell, if the horizontal bar is there, you work a oM1, if it's not there you knit.

Enjoy,
Deb

Thursday, 2 March 2017

Cables in-the-round made easier with "tells"

I'm not going to tell you how to make crossing your cables easier, with or without a cable needle. I'm not going to tell you how make your cable stitches neater.

What I want to talk about is how you can make some changes to a cable pattern to make working your cable crossings easier to keep track of. You can put cable "tells" in your pattern so that it can't keep it's poker face on.

Some cable patterns, especially wide ones, are very busy. There might be cable crossings happening somewhere on every right side row. If you're working in the round, you then have a working round where you cross and a comfort round where you knit the knits and purl the purls.

But some patterns have several rounds where no crossings take place. The simple rope cable is a prime example, *work 2 rounds with purls and knits, work a crossing round, work 5 rounds with purls and knits as set; repeat from *. The cable crossing is actually every 8th round.
How can you keep track? You can make ticks on the side of the page but did you make a tick this time or were you distracted as you worked the cable and did you forget? Are you sure?

Since you might be adding this to your top down sweater as a design feature, you get to be the boss of this pattern. So be the boss and make this easier to work. How about making the side stitches in garter stitch instead of all purl stitches. You can now count the garter ridges: 3 ridges showing above the last crossing (Rounds 5, 7 and 1), time to cross again (Round 3).
 A more complicated pattern could be added to. Give yourself something to "tell" you when to cross. Take this double crossed rope cable pattern with purl stitches in between the cables.
What if you added one stitch in the centre and knit it through the back loop every other round (K1tbl).
Now as you approach the pattern panel you can look over to see if that centre stitch is twisted or not. Count the twisted stitches and you know when to cross your cables again. Maybe make the side stitches in garter stitch too? How could you go wrong?!

One more idea. How about adding the "tell" on either side of your cable panel as a border. It won't interfere with the pattern itself but it will give you the needed information. Here I've added the garter stitches outside of the single rope cable pattern.
You are in the designer chair now so swatch and see what you like the look of. Adding "tells" makes your cable knitting experience much more enjoyable. No ticks on the page, no guessing about when to cross your cables. With a little bit of additional designing you can have relaxed, enjoyable cable knit.
-Deb


Monday, 27 February 2017

Place Cable in a Top Down Sweater

You can place a cable panel into a Top Down garment fairly easily. Here are a couple things to consider:

1.  Because cables pull in your fabric you will have to work a set of increase stitches in the round before setting up your pattern or in the first pattern row itself, before the first cable crossing. The rule is approximately 1 stitch increased for every 3 sts of a cable. A 6 stitch cable would need 2 sts increased. A 4 stitch cable would still require an increase of 2 sts. (See previous post: Cables, from Flat to in-the-round.)

2.  This is a Top Down garment. You are knitting this garment upside down.
That means that following the directions for your cable, starting with Row 1 and going to Row 8 say, will mean that Row 1 is just under your neck opening and Row 8 is a ways down the front of your sweater.

A terrific looking Horseshoe cable as you knit it looks like this.

But when you wear it, it appears like this.
Oops, all of the good luck from your horseshoes is leaking out because now your horseshoes are upside down.

So although it will baffle anyone watching you, you need to look through your stitch dictionary with it turned UPSIDE DOWN. In that position you will see what the cable will look like when the sweater is worn. It's fun to do, especially in public.

3.  Of course all the stitches in the cable are also turned upside down. This recent discussion prompted this response from LaurieofNepean: 
"We are all so used to looking at a cable one way (as we knit it) and don’t always consider how different it looks when we turn it upside down. For example, the “v”s are not structured the way our eyes want them to look.
I have come to the conclusion that it’s the symmetry issue that affects many cable patterns when they are worked upside down. Even a 3x3 cable looks different upside down and right side up. So I always swatch before I put any pattern into my top-downs. Then I turn the swatch upside down and look at it carefully to decide if I like the look. This is a fairly recent development in my knitting career. It comes from seeing so many publications where the swatches are obviously photographed upside down and so look funny."

Thanks Laurie. Swatching, yes, great advice. You should definitely take a look at how the cable is going to appear upside down before embarking on a sweater.

Stay tuned for the next post for a couple of tips on "tells" so that your cable can't maintain it's poker face.
Previous Post: Cables, from Flat to in-the-round
Deb

Wednesday, 22 February 2017

Cables, from Flat to Knit in-the-round

Let's jazz up a knit-in-the-round stockinette sweater by adding a Cable panel. There are many stitch dictionaries to check out various cables.
Here are a couple of things to consider before working in-the-round with a cable pattern:

1.  Most stitch dictionaries are written for flat knitting. There is a right side row where the cable crossing action is and a wrong side row worked back in knits and purls which amounts to "knit the knits and purl the purls".

2.  The symbols used in charts are meant to convey what the pattern will look like on the Right Side of the work. This is a bonus to in-the-round knitting since you are always looking at the Right Side.

A Simple Rope Cable written for flat knitting.

Worked Flat
Row 1, 5 & 7: (RS) P2, K4, P2.
Rows 2, 4, 6 & 8: (WS) K2, P4, K2. (You can see the chart is awkward to read on the wrong side rows. "-" is a knit stitch and the white box is now a purl stitch.)
Row 3:  P2, 2x2cross right, P2.


Worked in-the-round (all rounds read from Right to Left)
Rounds 1, 2, 4, 5, 6, 7 & 8: P2, K4, P2.
Round 3:  P2, 2x2cross right, P2.

How easy is that. The in-the-round version has every round exactly the same, except for the cable cross Round 3. You can see how the pattern is going to look on your sweater with those purl stitches at the side. Your knitting will look exactly like the chart.

3.  Cables pull in your fabric. If you are going to do your own designing and place a cable in a stockinette fabric garment you need to compensate for the pull-in or your garment will end up smaller than you want and with a ruffle effect at the top of a panel of cables and again at the bottom.
The rule is to increase 1 stitch for every 3 sts of a cable. This cable is a crossing of 2 over 2, total of 4 sts. I would increase 2 sts for this cable to compensate for the pull-in.

Now, when to work the increases and where?
You have to work the increases before the first cable crossing takes place*. This cable crossing is close to the beginning so I would work the increases as follows:
1.  You can work 2 increases in the knit round before you begin your cable panel. Say you are placing this cable down the centre front of your sweater, over the centre 6 sts work K2, M1(make one stitch), K2, M1, K2. Now you have 8 centre stitches and on the next round you can begin with Round 1 of the cable panel.
2.  You can work the 2 increases into the first round of the Cable Panel itself. This is what I would do. If you are working this cable down the centre front of your garment, work to the centre 6 sts, then I might work P2, M1(make one stitch), K2, M1, P2. Now I have 8 sts and Round 1 completed.
M1: With left needle lift the horizontal bar between the stitch just knit and the next stitch, from front to back, knit into the back of the resulting loop.

*If the first cable crossing is several rounds down the panel you can work the increases in the round before the first crossing takes place.

When you are finished working the desired length for your Cable panel, you have to decrease away the added stitches to get back to your original number of stitches. For this cable decrease 2 sts evenly across the panel so it's back to 6 sts again.

Next: Cables from the Top Down.
Stay tuned,
Deb

Monday, 13 February 2017

2 circular needles

Knitting on my UFO from the summer. I might just get it finished for this spring. That's a long time for a project to sit and still generate any interest but every time I work on it someone says they love the colour, that keeps me on track. I'm working down my second, that's right the second sleeve! I'm using 2 circular needles. The first sleeve was knit with double pointed needles and I thought this would be easier and ... it is. The sleeve has a wide pattern panel which with 2 circs I can keep it all on one needle.
It's helpful to have 2 circular needles that look different. The red wired needle has my entire 32 stitch pattern on it.
The bamboo tipped needle has the plain back of the sleeve on it where I'm working the decreases to taper the sleeve.
Have you used 2 circs before? It works by knitting half of the sleeve onto it's own needle. So the front stitch panel stitches are always on the red wired needle. All you do is push the stitches onto the needle tip and grab the other end of the same needle and knit. Really that simple. Drop that needle and pick up the other circ and work the other set of stitches with it.

The other circ not in use just swings away as you knit.

I can do this right down to the cuffs which I intend to get done this week. You heard it first here.
How are your UFOs going? Progress?
Deb
P.S. Yes t_a I think top down is really popular. YAY. The no sewing aspect seems to tip people over to it.
Hi Sharon, I was really glad I took my long circ needle and worked my sock with magic loop method. I can't imagine how many times I would have been chasing my needles since they do seem to want to jump away.

Sunday, 21 August 2016

Cabling Without A Cable Needle, 1 over 3 Cable

I also name this "Knitting Without a Safety Net". You will see why.

This is a Horseshoe Cable formed by two 1 over 3 Cables. The first Cable moves 1 stitch over 3 sts to the Left. The second Cable moves 1 stitch over 3 sts to the Right.

I start with my fingers. First the 1 over 3 CABLE LEFT where the stitch on the right is crossing over and in front of the 3 sts to the left.

That makes the 3 sts on the left the BACKGROUND STS and they are moving to the Right. Now to the actual knitting.

This works best with a sturdy, non-slippery yarn.
Move all the stitches to the tips of the needles. Take the 4 sts involved off the Left needle. YIKES. There they are hanging in mid-air.
With the Right needle, pick up the 3 Background sts. (I always pick up the Background sts first.)
 With Left needle, pick up the 1 stitch that is going to cross over in front.

Now slip the 3 Background sts back onto the Left needle. You can see the cross now.
Knit the 4 sts. Ta-Da. 1 over 3 cross Left is made.

Now for the other side of the Horseshoe Cable. The 1 over 3 Cross Right.
First the fingers.

Background sts will be moving to the Left.

Take the 4 sts off the Left needle
Pick up the 3 Background sts onto Left needle.
Pick up the 1 front stitch which will be crossing to the right with the Right needle.
Slip that 1 stitch onto Left needle and knit 4 sts.

Ta-Da. One Horseshoe Cable made with two 1 over 3 Cables Done.

You are now free to knit without a cable needle, if you dare!
-Deb


Thursday, 18 February 2016

Make your Raglan Sleeve Bigger or Smaller

Top Down Raglan sweaters are infinitely adjustable. An often neglected part of the sweater are the sleeves and sleeves seem to be one of the important parts of a garment that quite a few knitters need to adjust. It's quite simple on a Raglan Top Down to make your sleeves bigger or smaller than the pattern is going to give you for your size.

I learned quite a few new things through working on the Need A Plus Cardigan book and the Need A Circular Yoke book. Here's one important fact: your actual bust measurement (taken with a tape measure) doesn't necessarily indicate the size of your arms. If you have a large bust it does not automatically follow that you have large arms and vice versa. Wow, big news.

This means it's important to check your measurements against the pattern schematic.

Measure your actual bust and your actual upper arm with a tape measure.
Then add the amount of ease to the bust measurement you like (standard bust ease would be 3"/8cm).
Add approximately half that ease to your arm (1 1/2"/4cm). The amount of ease you like totally depends on personal preference of course. Maybe you like tight sleeves or extra loose sleeves. Measure the sleeves of some sweaters that you wear. I bet you'll find a wide range of sleeve width.

Find your closest Finished Size on this schematic and see if the sleeve is going to be the correct finished size for you.
Example:  actual bust measurement 39" + 3" of ease = 42" finished body
actual arm measurement 13" + 2" of ease = 15" finished sleeve  (I like 2" of sleeve ease on a cardigan.)

I would knit the 41" sweater because it's the closest size. But I want a 15" sleeve (my personal preference). The stitch numbers in this pattern will only give me a 14" sleeve. What to do?!

The place to make an adjustment is as you approach the bottom of the yoke. No one will see any adjustment you make here. Begin the pattern from the Top as written and then when you are closer to the bottom of the yoke, begin to think of your sleeves as separate parts of your garment. How would you like them to fit compared to the schematic. Would your ideal sleeve be a little bigger or a little smaller than the sleeve the pattern is going to give you.

Bigger Sleeve: Let's say I want the sleeve to be 1" bigger than this pattern is going to give me. For my gauge, say I need 6 more stitches (even number) on the sleeve. I work the yoke as written until I have 6 LESS stitches on my sleeve than the pattern says I should have at the bottom of the yoke. (This also totally works if you need the sleeve to be bigger by more than 1". Really it does.)

Bottom of Yoke before Divide Row: the pattern says I should have 56 sts on sleeve.
I'm going to stop when I have 50 sts (56 - 6 = 50 sts)

Now I'm going to work an extra increase right beside the regular Raglan increase, on both sides of my sleeve and work the regular Raglan increases on the Fronts and Back as written, to the bottom of the yoke.
On my sleeve: slip Marker, K1, work the regular Raglan YO increase, K1, work M1L (extra increase), work to 2 stitches before the Raglan Marker on the far side of sleeve, work M1R, K1, work regular Raglan increase, K1, slip Marker. You have increased 4 stitches on the sleeve in this row, the 2 regular Raglan increases + 2 extra increases. Repeat this until you have 6 extra stitches on the sleeve, 3 extra sts on each side of the sleeve.  (56 + 6 = 62 sts on sleeve). Ta, da, an extra inch added to my sleeves.
M1L: increase of 1 stitch: With Left needle, lift the running thread between the stitch just knit and the next stitch, from front to back and knit into the back of the resulting loop.
M1R: increase of 1 stitch: With Left needle, lift the running thread between the stitch just knit and the next stitch, from back to front and knit into the front of the resulting loop.
Here's a little sample I knit with YO increases and extra M1 increases beside them. You can hardly see those extra increases!

But let's say the sleeve as written will be too big for you. What then. This is even easier!
Smaller Sleeve: If you need your sleeve to be 1" smaller, then when you have 1" LESS stitches on your sleeve than the pattern calls for at the bottom of the yoke, you just STOP INCREASING on the sleeve. Yes, just stop. As easy as that. Continue to work the regular Raglan increases on the Fronts and Back. (This also works for knitters who need a sleeve several inches smaller.)

Example: 1" smaller sleeve: At bottom of yoke the pattern calls for 56 sts in my sleeve. I'm going to work the yoke as usual until I have 6 sts LESS (1" worth of stitches in my gauge, even number) on my sleeve. Then I'm going to stop increasing on my sleeves as I continue to work the regular Raglan increases on the Fronts and Back, to the bottom of the yoke.

Bottom of Yoke Before Divide Row: Pattern calls for 56 sts on sleeve.
I'm going to stop at 50 sts (56 - 6 = 50 sts). That will give me a sleeve that's 1" smaller than schematic.

Now continue to work increases on Fronts and Back and simply knit across the sleeve stitches. I suggest putting a safety pin in the fabric of your sleeves at either edge to remind yourself that you are only working across sleeve stitches without any further increases. It's easy to continue on autopilot and forget. Experience speaking here.
I stopped increasing on the sleeve 4 stitches before the bottom of this yoke and continued the YO increases on the body. The sleeve takes a dive into the underarm which is a great advantage.

I know, I know, some numbers are involved but not many. Have you tried making this adjustment? How did it work for you?
A good fitting sleeve will make all the difference to how your sweater fits.
More FIT blogs: Go to Where is My Waist. ; Go to Ease, how much?
-Deb

Thursday, 31 December 2015

Double Cast On

It's the beginning of a brand new year. What's on your knitting resolution list? Do you have one? Any other resolutions are not happening here. I'm not going to resolve to loose weight, eat better, exercise more, in general be a better person because, well, you know what those resolutions cause: guilt and anguish. Not going there.

My knitting resolution is to learn new things and pass them on to you. A win-win. Here's the first one. I learned a new cast on, a variation of the Longtail Cast On. If you're Not familiar with longtail cast on already this will be greek to you but ... if you want to try something new here it is.

Double Cast On. It's nicknamed My Way, Your (new) Way or Regular Way, New Way. In essence you are casting one 1 stitch in the regular longtail way and a second stitch in a new way. The only thing that's different is the yarn over the thumb.

The first stitch is your slip stitch. That counts as stitch#1 (the regular way).

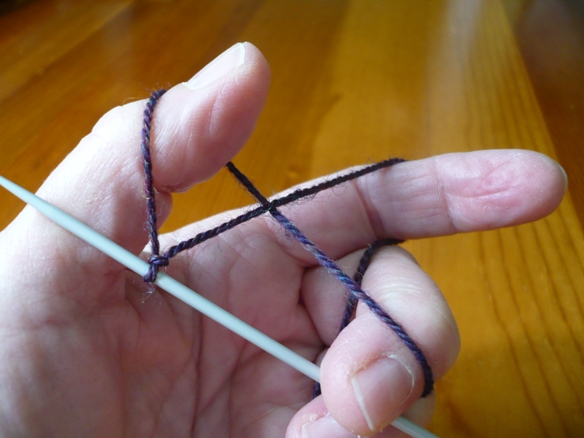
That means the second stitch is the New Way. It starts with the thumb. Swing your thumb to the front and under the front strand of yarn, coming up through the middle of the strands from the bottom.
Bring your needle down to the front of your palm. It looks a little different from the regular longtail cast on. If you think of your thumb as a needle, your stitch is sitting backwards.

 Continuing to think of your thumb as a needle, insert your needle into the back of the stitch (under the back strand on your thumb).

 Take your needle over the strand on your index finger.

 And bring your needle back through the stitch (loop) on your thumb.
 Snug it up to the needle. One stitch cast on. You can see a bar is produced across the front of the 2 stitches.

 Stitch#3 is your regular longtail cast on and stitch#4 is the new way. Two more stitches cast on with a bar holding them together.
 Getting into the swing of it? Old way, New way, Old way, New way.
Join in the round and work 2x2 rib.
Here's a very amateurish video (also part of my learning resolution) of the process with no sound, sorry, new camera needed.
Happy New Year,
Deb

Wednesday, 28 October 2015

Step or Graduate a stitch pattern

This week we've been working on our project for the Cabin Fever Retreat. There are only two more sleeps until we get started. Yay.

This weekend we are tackling those confusing words "incorporate the increases into your stitch pattern". Don't you just love to read that?

You can incorporate increases by stepping the pattern:
Work the increases until you have increased enough stitches on one side of your stitch pattern (at the raglan line) so that you can work one more full repeat of the stitch pattern.

This weekend we're going to work on gradually working some of the stitch pattern as each increase is added:

For a cowl with shoulder shaping:
It will be fun. Wish you were there,
-Deb