Showing posts with label sleeves. Show all posts

Thursday, 11 May 2017

Smaller Sleeve, Top Down

Yesterday, looking ahead, I realised that I have a couple of easy weeks in May without too much activity. That was a mistake. This morning I woke up with a sore ear and that feeling that a cold is imminent. Yuck. It's just like going on holiday and getting sick. So before I take a couple of days off to enjoy ill health (ha, ha) I wanted to show you something.

Many curvy women find that the sleeves of sweaters don't fit. One of the major finds for me when I was writing the Need A Plus Cardigan book was that bust measurement does not necessarily relate to arm measurements. Irregardless, the designer has to still come up with a set of sizes based on bust measurement. Lots of times the sleeves are too big.

If you measure your sweaters, including store-bought double knit jackets you wear, you will probably find that you do wear a large range of sleeve sizes. But you are probably trying to knit your new sweater with an inch to two inches of ease around the sleeve. The schematic is indicating that for your size you are going to get a certain size of sleeve. If you need the sleeve to be smaller, stop increasing on the sleeve about an inch from the bottom of the yoke (one inch less stitches on the sleeve than the pattern says you need at the bottom of the yoke). But what will happen? Won't it distort the raglan line. Yes it will.

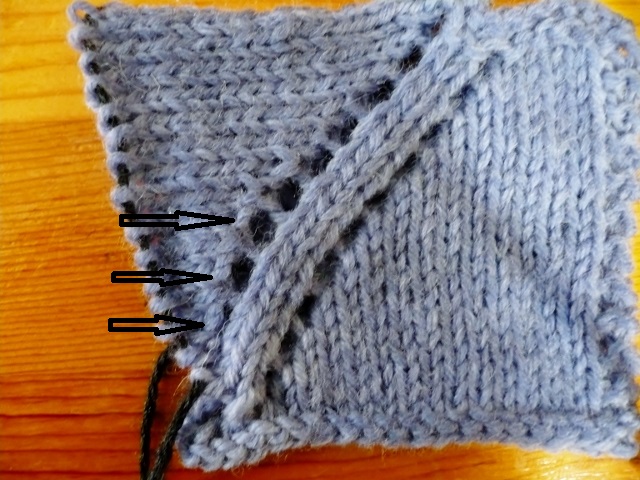
I just happen to be knitting a sweater with this feature. I've stopped increasing on the sleeve. Here is a photo of one of the back raglan lines. Can you see where it changes?

Here it is with the black line indicating where the raglan line would have continued and the red line showing the deviation.

Here is a close up.
Doesn't this look remarkably like what your set-in sleeve armhole would look like at this juncture?
I think it's actually an advantage to have the raglan line swing in toward the armpit. I'm working it into the pattern I'm working on now.
Deb


Monday, 13 February 2017

2 circular needles

Knitting on my UFO from the summer. I might just get it finished for this spring. That's a long time for a project to sit and still generate any interest but every time I work on it someone says they love the colour, that keeps me on track. I'm working down my second, that's right the second sleeve! I'm using 2 circular needles. The first sleeve was knit with double pointed needles and I thought this would be easier and ... it is. The sleeve has a wide pattern panel which with 2 circs I can keep it all on one needle.
It's helpful to have 2 circular needles that look different. The red wired needle has my entire 32 stitch pattern on it.
The bamboo tipped needle has the plain back of the sleeve on it where I'm working the decreases to taper the sleeve.
Have you used 2 circs before? It works by knitting half of the sleeve onto it's own needle. So the front stitch panel stitches are always on the red wired needle. All you do is push the stitches onto the needle tip and grab the other end of the same needle and knit. Really that simple. Drop that needle and pick up the other circ and work the other set of stitches with it.

The other circ not in use just swings away as you knit.

I can do this right down to the cuffs which I intend to get done this week. You heard it first here.
How are your UFOs going? Progress?
Deb
P.S. Yes t_a I think top down is really popular. YAY. The no sewing aspect seems to tip people over to it.
Hi Sharon, I was really glad I took my long circ needle and worked my sock with magic loop method. I can't imagine how many times I would have been chasing my needles since they do seem to want to jump away.

Thursday, 18 February 2016

Make your Raglan Sleeve Bigger or Smaller

Top Down Raglan sweaters are infinitely adjustable. An often neglected part of the sweater are the sleeves and sleeves seem to be one of the important parts of a garment that quite a few knitters need to adjust. It's quite simple on a Raglan Top Down to make your sleeves bigger or smaller than the pattern is going to give you for your size.

I learned quite a few new things through working on the Need A Plus Cardigan book and the Need A Circular Yoke book. Here's one important fact: your actual bust measurement (taken with a tape measure) doesn't necessarily indicate the size of your arms. If you have a large bust it does not automatically follow that you have large arms and vice versa. Wow, big news.

This means it's important to check your measurements against the pattern schematic.

Measure your actual bust and your actual upper arm with a tape measure.
Then add the amount of ease to the bust measurement you like (standard bust ease would be 3"/8cm).
Add approximately half that ease to your arm (1 1/2"/4cm). The amount of ease you like totally depends on personal preference of course. Maybe you like tight sleeves or extra loose sleeves. Measure the sleeves of some sweaters that you wear. I bet you'll find a wide range of sleeve width.

Find your closest Finished Size on this schematic and see if the sleeve is going to be the correct finished size for you.
Example:  actual bust measurement 39" + 3" of ease = 42" finished body
actual arm measurement 13" + 2" of ease = 15" finished sleeve  (I like 2" of sleeve ease on a cardigan.)

I would knit the 41" sweater because it's the closest size. But I want a 15" sleeve (my personal preference). The stitch numbers in this pattern will only give me a 14" sleeve. What to do?!

The place to make an adjustment is as you approach the bottom of the yoke. No one will see any adjustment you make here. Begin the pattern from the Top as written and then when you are closer to the bottom of the yoke, begin to think of your sleeves as separate parts of your garment. How would you like them to fit compared to the schematic. Would your ideal sleeve be a little bigger or a little smaller than the sleeve the pattern is going to give you.

Bigger Sleeve: Let's say I want the sleeve to be 1" bigger than this pattern is going to give me. For my gauge, say I need 6 more stitches (even number) on the sleeve. I work the yoke as written until I have 6 LESS stitches on my sleeve than the pattern says I should have at the bottom of the yoke. (This also totally works if you need the sleeve to be bigger by more than 1". Really it does.)

Bottom of Yoke before Divide Row: the pattern says I should have 56 sts on sleeve.
I'm going to stop when I have 50 sts (56 - 6 = 50 sts)

Now I'm going to work an extra increase right beside the regular Raglan increase, on both sides of my sleeve and work the regular Raglan increases on the Fronts and Back as written, to the bottom of the yoke.
On my sleeve: slip Marker, K1, work the regular Raglan YO increase, K1, work M1L (extra increase), work to 2 stitches before the Raglan Marker on the far side of sleeve, work M1R, K1, work regular Raglan increase, K1, slip Marker. You have increased 4 stitches on the sleeve in this row, the 2 regular Raglan increases + 2 extra increases. Repeat this until you have 6 extra stitches on the sleeve, 3 extra sts on each side of the sleeve.  (56 + 6 = 62 sts on sleeve). Ta, da, an extra inch added to my sleeves.
M1L: increase of 1 stitch: With Left needle, lift the running thread between the stitch just knit and the next stitch, from front to back and knit into the back of the resulting loop.
M1R: increase of 1 stitch: With Left needle, lift the running thread between the stitch just knit and the next stitch, from back to front and knit into the front of the resulting loop.
Here's a little sample I knit with YO increases and extra M1 increases beside them. You can hardly see those extra increases!

But let's say the sleeve as written will be too big for you. What then. This is even easier!
Smaller Sleeve: If you need your sleeve to be 1" smaller, then when you have 1" LESS stitches on your sleeve than the pattern calls for at the bottom of the yoke, you just STOP INCREASING on the sleeve. Yes, just stop. As easy as that. Continue to work the regular Raglan increases on the Fronts and Back. (This also works for knitters who need a sleeve several inches smaller.)

Example: 1" smaller sleeve: At bottom of yoke the pattern calls for 56 sts in my sleeve. I'm going to work the yoke as usual until I have 6 sts LESS (1" worth of stitches in my gauge, even number) on my sleeve. Then I'm going to stop increasing on my sleeves as I continue to work the regular Raglan increases on the Fronts and Back, to the bottom of the yoke.

Bottom of Yoke Before Divide Row: Pattern calls for 56 sts on sleeve.
I'm going to stop at 50 sts (56 - 6 = 50 sts). That will give me a sleeve that's 1" smaller than schematic.

Now continue to work increases on Fronts and Back and simply knit across the sleeve stitches. I suggest putting a safety pin in the fabric of your sleeves at either edge to remind yourself that you are only working across sleeve stitches without any further increases. It's easy to continue on autopilot and forget. Experience speaking here.
I stopped increasing on the sleeve 4 stitches before the bottom of this yoke and continued the YO increases on the body. The sleeve takes a dive into the underarm which is a great advantage.

I know, I know, some numbers are involved but not many. Have you tried making this adjustment? How did it work for you?
A good fitting sleeve will make all the difference to how your sweater fits.
More FIT blogs: Go to Where is My Waist. ; Go to Ease, how much?
-Deb

Thursday, 3 September 2015

Where to work the Next Sleeve Decrease


I have a pet peeve. I don’t like seeing knitters mark little ticks on their patterns to keep track of the rounds they have worked. If you can learn to read your knitting you can be tick-free (pun intended).
Right now I’m knitting a sleeve in the round from the should down to the wrist. My sleeve shaping instructions are as follows:

Knit 7 rounds.
Decrease Round 8: K1, SSK, knit to last 2 sts, K2tog.  (SSK: Slip as if to knit, slip next stitch as if to knit, insert Left needle into fronts of 2 slipped sts and knit them together)
Repeat last 8 rounds.
I'm decreasing every 8th round.
The decrease I keep track of is the SSK since it’s easier to see. When you complete Round 8, the decrease you just worked sits below the new stitch you just made as you knit 2 sts together which is sitting on the needle. The Round 8 stitch is on the needle and the decrease sits just below it. Maybe the photo works better for you.

I’m going to do the next set of decreases on the next Round 8. You can count the rounds I've knit. A knit stitch looks like a "V". I'm counting the column of stitches above the SSK.
 Round 8 + Rounds 1, 2, 3, 4, 5, 6 & 7. Now on the next round, Round 8, I'll do another set of decreases.
That's the explanation but it's not how I actually count the rounds. When I look at my knitting and this photo, I can see 8 knit rounds (column of "V's") above the obvious SSK. All I've done is renumber the rounds. The number of knitted rounds is the same as the photo above. In fact it's the same photo with the rounds counted differently.
When I can see and count 8 rounds above the obvious SSK (including the stitch on the needle), I work my Decrease Round on the next round.
I worked the Decrease Round. If I count the rounds I can see above the bottom SSK, there is a new SSK on the 8th round. It works.
If you need to decrease every Round 8. Knit around until you can SEE 8 rounds above the last SSK (including the round on the needle) then work your Decrease Round. If you need to decrease every 6th round, count 6 rounds above the last SSK and do the decrease round.
I'm almost sure you don't believe me but this totally works. The rounds are easy to see and count and I never, ever go wrong on my sleeve decreases using this method. OK, almost never, except during a really interesting movie. No ticks, no mistakes. Would I steer you wrong?
-Deb

P.S. I like the idea of a "collection" CathyK. Nice.
Robebe: Giving away yarn that someone else is going to work on and give to charity sounds like an excellent plan to me.

Thursday, 20 March 2014

Move the Markers to Adjust Sleeves and Body

I'm just writing the custom fit section of the new book Need A Circular Yoke (which should be ready in June). I had an idea for an easy adjustment to get a better fitting sleeve. Thinking out loud here so please wade in with your opinion.

After working the circular yoke, we come to the Great Divide where you put the sleeve stitches on spare yarn to work later and cast on underarm stitches so you can carry on with the Body. You will have placed Markers to delineate the Back, Sleeves and Front for the Divide Round.

Let's say you really wanted a sleeve that is 1" wider than the schematic indicates. You could move your sleeve Markers out at the sides 1/2" on each side to make the sleeve wider when you work the Divide Round.
This makes the Back and Front narrower. Additional width (add 1" on each side of the Front) could be made up on the Front with the Bust Increases to the correct number of Body stitches. The Back would remain narrower.
The new increases in this book give a flater line of Bust Increases which mean you could easily work an extra inch in the bust shaping.
What do you think? Would this work?
-Deb