Showing posts with label Need A Plus Cardigan?. Show all posts

Thursday, 18 February 2016

Make your Raglan Sleeve Bigger or Smaller

Top Down Raglan sweaters are infinitely adjustable. An often neglected part of the sweater are the sleeves and sleeves seem to be one of the important parts of a garment that quite a few knitters need to adjust. It's quite simple on a Raglan Top Down to make your sleeves bigger or smaller than the pattern is going to give you for your size.

I learned quite a few new things through working on the Need A Plus Cardigan book and the Need A Circular Yoke book. Here's one important fact: your actual bust measurement (taken with a tape measure) doesn't necessarily indicate the size of your arms. If you have a large bust it does not automatically follow that you have large arms and vice versa. Wow, big news.

This means it's important to check your measurements against the pattern schematic.

Measure your actual bust and your actual upper arm with a tape measure.
Then add the amount of ease to the bust measurement you like (standard bust ease would be 3"/8cm).
Add approximately half that ease to your arm (1 1/2"/4cm). The amount of ease you like totally depends on personal preference of course. Maybe you like tight sleeves or extra loose sleeves. Measure the sleeves of some sweaters that you wear. I bet you'll find a wide range of sleeve width.

Find your closest Finished Size on this schematic and see if the sleeve is going to be the correct finished size for you.
Example:  actual bust measurement 39" + 3" of ease = 42" finished body
actual arm measurement 13" + 2" of ease = 15" finished sleeve  (I like 2" of sleeve ease on a cardigan.)

I would knit the 41" sweater because it's the closest size. But I want a 15" sleeve (my personal preference). The stitch numbers in this pattern will only give me a 14" sleeve. What to do?!

The place to make an adjustment is as you approach the bottom of the yoke. No one will see any adjustment you make here. Begin the pattern from the Top as written and then when you are closer to the bottom of the yoke, begin to think of your sleeves as separate parts of your garment. How would you like them to fit compared to the schematic. Would your ideal sleeve be a little bigger or a little smaller than the sleeve the pattern is going to give you.

Bigger Sleeve: Let's say I want the sleeve to be 1" bigger than this pattern is going to give me. For my gauge, say I need 6 more stitches (even number) on the sleeve. I work the yoke as written until I have 6 LESS stitches on my sleeve than the pattern says I should have at the bottom of the yoke. (This also totally works if you need the sleeve to be bigger by more than 1". Really it does.)

Bottom of Yoke before Divide Row: the pattern says I should have 56 sts on sleeve.
I'm going to stop when I have 50 sts (56 - 6 = 50 sts)

Now I'm going to work an extra increase right beside the regular Raglan increase, on both sides of my sleeve and work the regular Raglan increases on the Fronts and Back as written, to the bottom of the yoke.
On my sleeve: slip Marker, K1, work the regular Raglan YO increase, K1, work M1L (extra increase), work to 2 stitches before the Raglan Marker on the far side of sleeve, work M1R, K1, work regular Raglan increase, K1, slip Marker. You have increased 4 stitches on the sleeve in this row, the 2 regular Raglan increases + 2 extra increases. Repeat this until you have 6 extra stitches on the sleeve, 3 extra sts on each side of the sleeve.  (56 + 6 = 62 sts on sleeve). Ta, da, an extra inch added to my sleeves.
M1L: increase of 1 stitch: With Left needle, lift the running thread between the stitch just knit and the next stitch, from front to back and knit into the back of the resulting loop.
M1R: increase of 1 stitch: With Left needle, lift the running thread between the stitch just knit and the next stitch, from back to front and knit into the front of the resulting loop.
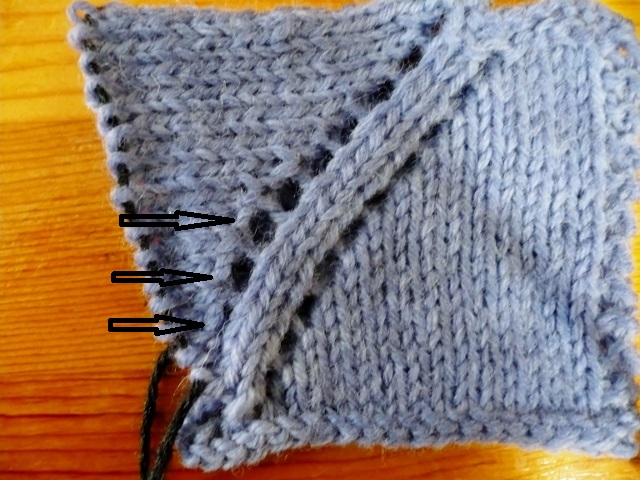
Here's a little sample I knit with YO increases and extra M1 increases beside them. You can hardly see those extra increases!

But let's say the sleeve as written will be too big for you. What then. This is even easier!
Smaller Sleeve: If you need your sleeve to be 1" smaller, then when you have 1" LESS stitches on your sleeve than the pattern calls for at the bottom of the yoke, you just STOP INCREASING on the sleeve. Yes, just stop. As easy as that. Continue to work the regular Raglan increases on the Fronts and Back. (This also works for knitters who need a sleeve several inches smaller.)

Example: 1" smaller sleeve: At bottom of yoke the pattern calls for 56 sts in my sleeve. I'm going to work the yoke as usual until I have 6 sts LESS (1" worth of stitches in my gauge, even number) on my sleeve. Then I'm going to stop increasing on my sleeves as I continue to work the regular Raglan increases on the Fronts and Back, to the bottom of the yoke.

Bottom of Yoke Before Divide Row: Pattern calls for 56 sts on sleeve.
I'm going to stop at 50 sts (56 - 6 = 50 sts). That will give me a sleeve that's 1" smaller than schematic.

Now continue to work increases on Fronts and Back and simply knit across the sleeve stitches. I suggest putting a safety pin in the fabric of your sleeves at either edge to remind yourself that you are only working across sleeve stitches without any further increases. It's easy to continue on autopilot and forget. Experience speaking here.
I stopped increasing on the sleeve 4 stitches before the bottom of this yoke and continued the YO increases on the body. The sleeve takes a dive into the underarm which is a great advantage.

I know, I know, some numbers are involved but not many. Have you tried making this adjustment? How did it work for you?
A good fitting sleeve will make all the difference to how your sweater fits.
More FIT blogs: Go to Where is My Waist. ; Go to Ease, how much?
-Deb

Thursday, 19 November 2015

Blocking before the end.

Blocking, do you ever do it before you finish the sweater?

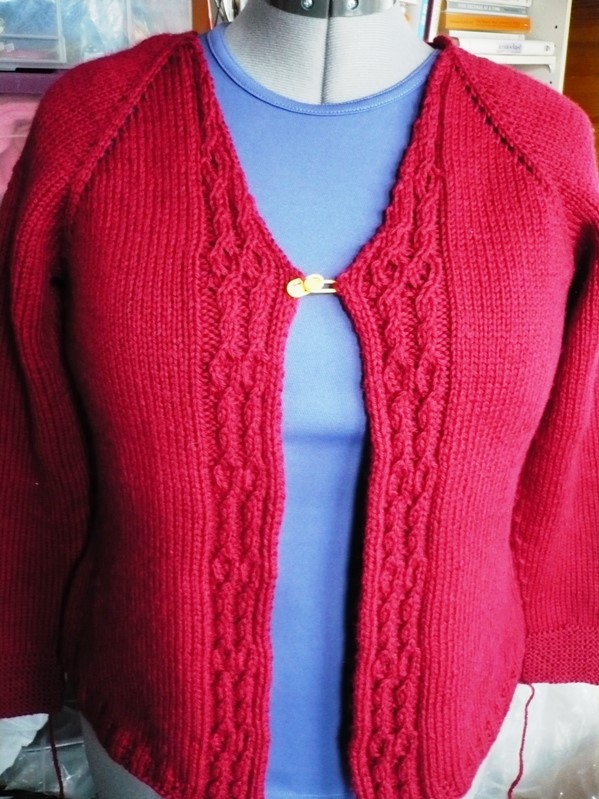
I put my Panel cardigan worked with Twisted Stitches from the Need A Plus Cardigan book on my adjust-to-size mannikin and was less than impressed since I was really careful about the gauge and thought I had it perfect. It was looking like I was going to have to work a really wide buttonband to bridge the gap in the front.

And the twisted stitches were pulling the back in quite a bit.
So I decided I would give it a soak and let it dry and see where I was.

I think I could hear my sweater saying "ahhhh, at last". It relaxed a whole lot. It looks so much better. The back Panel has relaxed and hangs straight.

The front is going to be fine once I do the buttonband. The next time I block with the buttonband in place the Front Panels will relax even more. Now I'm excited to get finished so I can wear it.
And it's RED. Just imagine the lift to my purple/blue wardrobe.
-Deb

Friday, 4 July 2014

Bust vs Upper Bust measurement to determine finished size

Which measurement do you use to determine the size to knit?

Do you work according to the actual measurement of your bust? The size of your bust then affects the entire sweater. The neckband, sleeves and bottom edge will all be calculated to match your bust. Also, in most patterns, the Front and Back will be the same width, half of your total bust measurement plus ease. Most of the time I think this works for lots and lots of knitters. But those of you who are busty have probably run into problems since your Back is much narrower than your Front.

Or do you take a tape measurement of your upper bust (measure your chest at your underarm level) and base the sweater size on that measurement with some ease added in? Would this work for you? This makes the neck opening smaller, the shoulders narrower and the underbust smaller. If you make no adjustment at your bust, you have a sweater with negative ease (snug across the bust) which might be great for you (especially if you have a smaller bust). Otherwise you must be ready to work some accomodation for your bust since it hasn't come into the equation for size at all.

The concept behind the Need A Plus Cardigan book sizing was a compromise since I don't know your exact measurements. What if you worked the sweater one size smaller at the top of the chest? That would give you an upper chest about 3" smaller. Then add 3" of fabric across the Front Only exactly where you need it.
On the sweater I'm working on now, I was very generous with the amount of fabric I added across the Bust. So now I'm taking away some of that extra fabric as I begin my waist shaping (which I have to start immediately below my bust, have I mentioned that I'm really short?!). I worked 2 sets of extra decreases on the Fronts Only in between my usual waist shaping decreases. This should give me a shapely Front!
Continuing to try out different shaping options. Any thoughts?
Deb
P.S. t_a, I'd love it if you could play the fiddle on my new decking. Wouldn't that be great.
lpm, yes, knitting and swinging a hammer in Northern Ontario, on the shore of Lake Huron.

Thursday, 29 May 2014

Swatches can Lie!

Oh, no. This is terrible. Swatches can lie. Not for everyone but maybe for you and definitely for me. If you find that lots of your garments are bigger or smaller than you thought they would be, read on.

When you knit a swatch are you very careful? Are you looking at every stitch, knitting slower than usual? Are all your stitches perfectly formed and looking beautiful. Do you knit a large swatch? What happens when you knit while chatting with a friend, or as your mind wanders, or while watching TV?

You got it. Your gauge can change. When I teach classes I have the knitters work a swatch, cast on for their sweater and work several inches of their top down sweater. Then we check the gauge again. In every class, one third of the knitters have found that their gauge has shifted. Usually they have loosened up and every once in a while someone has tighten up.

What to do?!
1.  Rip back and start again with smaller or larger needles to get the correct gauge. I think we've all done this one.

2.  Continue on and work to a smaller or larger size to compensate for the gauge shift.

3.  For knitters working out of one of the Cabin Fever multi-gauge books there is a good solution. Continue to work with your New gauge and change to a new set of stitch numbers that correspond to your New gauge.

There's a very good reason I write these books. I don't get gauge and, I admit it, my gauge changes.

Say I started out working 20 sts = 4" (same as 5 sts = 1") according to my swatch. Now I'm 4" down my top down sweater and I discover that I'm really working at 18 sts = 4" (4.5 sts = 1"). Yikes, my sweater is going to be too big. At this point I can continue knitting and working my raglan increases as usual, towards the stitch numbers for the Bottom of the Yoke. But now I'm going to work to the stitch numbers for my New gauge instead of my original gauge (especially the Back) so that my sweater will fit.

The top chart is the number of stitches for the Bottom of Yoke for my size, assuming I'm working at 20 sts = 4" gauge (top chart). At the Bottom of the Yoke, in my original gauge, I want to knit until my Front has 44 sts, Sleeve has 60 sts and Back has 88 sts. BUT my gauge has shifted to 18 sts = 4". So I'm going to move to the line of stitch numbers for my New gauge (see shaded line on bottom chart).
Now, working in my New gauge, I'm going to work until my Back is 78 sts (instead of 88 sts at original gauge). This will ensure that my Back, and therefore my Front, will fit for my size at the New gauge which I will maintain for the rest of my sweater. I'm knitting at a looser gauge than originally planned, so I will work my Back and Front with less stitches to get my size.

This works for many, many knitters. It saves the stress of ripping out or recalculating all your numbers. Just shift to a new line of stitch numbers that correspond to the gauge you are now knitting.

Your swatches may be wonderfully truthful. You may get gauge and maintain it. I hope you do. But if you don't, these multi-gauge books have an added advantage for you.

These numbers are out of one of the Need A ... series of Multi-gauge books by Cabin Fever. http://www.cabinfever.ca/knittersbooks.html ;

Questions? I'm sure you have some.
-Deb

 Thanks for your comments. I really appreciate hearing from you.


Monday, 24 March 2014

Bust Shaping

Good question Brenda (from the comments). I continue to look for ideas for Bust Shaping of women's garments. The idea that the Front should be wider than the back seems to make soooo much sense.
In the Need A Plus Cardigan? book we worked Bust Increases on the Fronts below the Divide so that they look like this. The Bust Increases are worked every other row.

For the pullover I have found that I can increase every round and there is room for more increases since it is a flatter dart.
It's interesting to discover more ways to work for a better Fit.
-Deb
P.S. What do you think, Brenda?
T_A, thanks for your lovely comments. I hope there will be some more information for you in the upcoming book. It's really coming along and I'll be posting some more photos as we finish up some more knitting.

Friday, 8 November 2013

Size It Smaller

Top Down garments really lend themselves to specific sizing.

You guessed it, Lyn is not a plus size but the cardigan from the Need A Plus Cardigan? book can be easily adapted to a smaller size than the pattern is written for or to work in between sizes. The smallest size in the book is for a 44" finished sweater. We made the green one 42" finished.

The green cardigan for Lyn, and the new blue cardigan for myself, are cast on as written in the book for the size 44". The Yoke was knit as written for the 44" size until I was an inch or two from the bottom of the Yoke. The adjustment for sizing is done in the last couple of inches before the Divide Round.

I checked the chart for the number of stitches required for the Bottom of the Yoke for the 44" size then contemplate my size change. I want to make it 2" smaller for a 42" cardigan. I want the Back to be 1" narrower and the Front 1" narrower.

The chart for the Bottom of the Yoke gives me stitch numbers for the Front, sleeve, Back, sleeve and second Front for the 44" size. I only look at the Back. If I subtract 1" worth of stitches (approximately 6 sts if using DK yarn for example) from the number of Back stitches in the chart, that would make my Back 1" narrower.
Bottom of Yoke Chart (pg.17):  size 44"  Back 96 sts
Adjusted for size 42" by subtracting 6 sts:  new Back will have  90 sts

When I knit to that number of Back stitches that automatically takes 1" off the Total Front too, which gives me a cardigan that is 2" smaller. Ta, Da, done.

I knit the Yoke until I hit the adjusted number of stitches for the Back and continue to work the Great Divide using my markers as a guide (because now my stitch numbers don't match the Divide chart). I cast on the correct number of stitches for the underarm cast on and continue with the pattern for Bust Increases, etc, as written. The Body of my garment is now the 42" size I wanted.

You may wonder if the back of the neck would be too wide since we're downsizing. On these cardigans the front Buttonband is picked up in one piece all the way around. When I knit across the my first buttonband round 1 decreased 3/4"-1" worth (5 sts) across the back of neck. Now it's narrow enough.

Do you need to work in between sizes for a better fit? That's really, really easy. Next to no math. I'll tackle that next. Stay posted.
-Deb

Monday, 4 November 2013

Can't put it down

Do you have projects that you love knitting so much you just can't stop? I'm knitting one now, the Panel Cardigan out of the Need A Plus Cardigan? book . I like to knit adult-sized sweaters but must admit that some of them are more fun to knit than others, especially near the end. This is going really fast. The Lace Panels are interesting to knit and the stocking stitch in between is a rest and motors along to the next Panel. And this is for MYSELF, Yay.

Here's Lyn in one of the lace cardigans from the book. This is the one I'm reproducing. I really like the collar. I think I'll put a lace edge at the bottom of 3/4 length sleeves.
Mine is in blue.
The pattern is really pretty. 
Have you knit something lately you couldn't put down?
-Deb

P.S. Brenda (from the comments) A NEW blue cardigan for the next 6 years!
t_a (from comments) The scissors are very, very scary the first time you use them.

Monday, 1 April 2013

I'm doing a class at the Spring MidWest Masters retreat based on the Need A Plus Cardigan? book so I borrowed the cover cardigan back from Christine to take with me.
And I'm so excited, it's BEEN WORN and not just once either but several times. I couldn't be more pleased. There is nothing worse that seeing something you knit for someone sitting in pristine condition because it's too good to wear! This sweater is no longer in pristine condition. Yay!

I started one for myself several months ago and put it aside but have picked it up again and although it's getting late, I might still get some wear out of it this spring (since it's not quite here yet). I'm going to use it to indicate the body shaping that can be done. The markers are in the waist decreases and now I'm starting the hip increases. The markers make it seem like it's going quicker.

-Deb

Friday, 28 September 2012

If I put it in writing then it's a promise, right? I'm sewing buttons this weekend. You read it here so it must be true.
These two vests will be finished on Monday.

Meanwhile on the knitting front, I'm further along on my Twist Panel from the Need A Plus Cardigan? book.
I'm starting the waist shaping now. The pattern is memorized and I'm trying to decide how long to make it.
-Deb