Showing posts with label circular yoke. Show all posts

Thursday, 6 July 2017

Lightening picture day

It's time to get out my phone and take some photos. My camera is in repetitive cycle of zooming in and out and then shutting off. I think that means it's toast. So I'm debating about buying another camera or using my phone? Any thoughts on this?

My Lightening pullover is done and on my mannequin. No one to take my photo so she is it.
I even dressed her up and put a skit on her. She's better dressed than I am. 

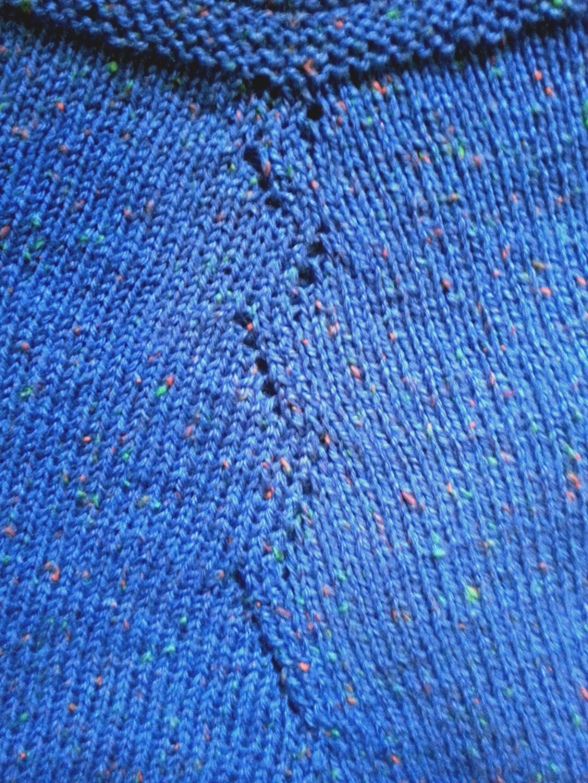
The Lightening Bolts get larger and larger as they travel down the sweater. I charted it all out although I'm sure you can figure it out pretty quickly. Then you just have to count holes. They also go down the sleeve shoulder.

The yoke starts out with 8 bolts and then is widdled down to 4 and then only 2. It will keep you on your toes!

There is side shaping too. Lots to keep you busy.
One more check through the pattern and then I will post it next week. I already have my next sweater idea waiting in the wings. It's anxious to be centre stage.
Deb

Thursday, 29 June 2017

Raining while Lightening Bolts dry

Sometimes designs take a very long time to finalize. I'm close on the Lightening Bolts. It's been a journey with changes, changes back and then reversed. The only idea I had in my head at the beginning was for the yoke with the lightening bolts. The rest of the sweater needed to be worked out on the needles, ripped back and worked again. I'm really happy with the shaping which formed because of the continued increases down the front and back and the decreases needed at the sides. A happy result.

 It's washed now and photos are up next. Not today since it's raining again while my sweater drys, sort of.

Deb
P.S. Thanks for the hat crown suggestions Brenda. I will put them in. The first triangle goes around your entire head. The second triangle fills in the space to make it a tube. Now I'm working on putting stripes in just for the fun of it.

Thursday, 6 April 2017

Progress and some Questions

I'm trying to get ahead of the season and get a summer top knit before summer is here. You know what that's like. It's summer and I wish I had a cotton top to wear. No problem, ever the optimist, I'll start knitting now and guess what?! It's fall already!

So I'm patting myself on the back (hard to do but I'm practicing). I've almost got my Lightening design finished.
I solved my chart issue. I'm learning to just let things go for a couple of days knowing that one morning it will be very clear that I've made a decision. Isn't it incredible that your brain can do this without you even knowing that it's happening?

I'm going to go with chart option#1 since it is the easiest one to read and I can imagine the knitter putting a little tick in every "0" (increase) on the chart as it's worked to keep track. One of the wonderful things about charts is that they are a visual representation of the knitting. In this case it isn't but making it easy to knit is my first priority. I'm happy with the results.

I used the openM1 to work all the increases for my Lightening Bolts. If you haven't tried this increase yet I'd give it a go. It's surprisingly easy.

I also have the pattern written. Pat on the back again (I could get used to this). Now I have to read it over and give some serious thought to making it really easy for the knitter (that's you) to knit up (or down as it were, tee, hee).

There's quite a lot happening around the Great Divide (putting the sleeves on spare yarn and leaving the body on the needles). These are the question I have to ask:
1. Is this, as written, too much to work in one round? Can I make it any clearer?
2. Can I split it up into a couple of rounds and work the Divide in the first round and make the changes to the stitch pattern in the next round?
3. Do I need to put in exact stitch counts or can I use the Marker placements? Use both?

Do you have some thoughts for me? Do you like to work one thing at a time? Do you like one big round with lots going one so that it's done?

I only have the border of one sleeve to finish today. I'm really looking forward to wearing my new top at the Yarn Over Sleep Over retreat in a couple of weeks.
-Deb

Thursday, 9 March 2017

Red Fingering weight pullover has begun

I'm thinking of spring as the snow flies here. We've had a couple of days of spring-like weather and now it's cold again and seems colder somehow. Spring is coming so I've decided it's time to start spring knitting. I'm taking the plunge and finally knitting a fingering weight pullover. So far so good.
It's a circular yoke pullover in Saucon Fingering (cotton/acrylic blend). Should be nice and cool to wear in the warm weather. See, so optimistic, it will get warm soon. I'm quite surprised that I'm almost at the great divide. It hasn't been too much knitting yet. I've given myself an interesting set up of increases to keep me busy and I'm looking forward to dividing off the sleeves. That's the moment when it looks more like a sweater. I'm intending to keep the increase pattern working down the front. I think I'll need the distraction.

Reading this over I see I have convinced myself that this is a lot of knitting. Preconceived ideas can stop this before it gets very far so I'm going to try to keep an open mind.

Have you knit a fingering weight garment? Did you like wearing it? Would you do another one?
Deb

Thursday, 19 March 2015

Decision week

Kathy, one of the students in my Mittlets by Formula class, reminded me that I haven't written my blog in several weeks and she was checking. So here I am, thanks for the kick in the ... I needed it.

I get mired in projects that are partly done and can't seem to find my way out. My Blue is stalled. I can't decide if it's long enough. I'm going to make a decision this week and stick to it.
It looks long enough to me but trying it on is the test and I've done that several times which usually means I'm close or waaaay off and don't want to believe it.  I really like the Back.
Done in Cotton Tweed, Just Navy. I love this dark, dark navy. Much darker than photo shows.

And then to get ahead of the season I started a summer knit. A circular yoke following the Need A Circular Yoke numbers, in Saucon Fingering (cotton/acrylic) with a 3.50mm needle to get 6 sts = 1".  (It's really Cherry red, I don't know how the camera makes it pink.) 
The yoke has a mosaic colour pattern. I really enjoyed the affect. It's great to only have to work with one colour at a time and get a great two-colour affect.
Down to the bottom of the bust now. I'm putting in a line of purple and going to work out some sort of columns of increases down the front and back. Another decisions to make.

And because these are bigger projects I had to start something smaller to carry around with me. I'm calling them Catch The Wave Socks. They are surprisingly easy to pick up and put down again. That's the beauty of stitch patterns that work the same every round. Very little angst about which round I'm on. Who needs more angst?
Decision week. Do you have to make some this week?
-Deb

Tuesday, 5 August 2014

Think Inside the Box

Do you like that phrase "think outside the box"? I must admit that I don't. I once heard someone say that outside the box is a lonely place. It's the place for geniuses. Geniuses think up weird and wonderful stuff and then wait for the rest of us to catch up. Sometimes we do and often we don't.

On the other hand, the centre of the box is a very safe place. It's where lots and lots of people are and never venture away from. Safe if great lots of the time. But sometimes we can get stale there. It's fantastic knitting when you love what you're seeing in the photo or you're stressed in other areas of your life and need something to turn out right. I do it myself from time to time.

But what if we ventured closer to the outside edge of the box? That's where interesting things can happen. You might add in a stitch pattern you made up yourself. I bet it would look great. Or exaggerate some feature of the sweater, like the shaping. How about a really, really wide A-line? Or take a chance and pinch in that waist one more inch. How about an assymetrical bottom border just for the fun of it. It might surprise you how good it can look. Not quite knowing the outcome is a little scary but it certainly adds a little spice to your knitting and possibly a new "look" to your sweater wardrobe.

I'm hoping that the Need A Circular Yoke book takes you closer to the outside of the box. All the numbers are there but the decisions are yours. If you're taking on the challenge of putting together your own sweater I applaud you. I'm glad you're coming on the ride. Join us at Need A Circular Yoke KAL for some company along the journey, advice and answers to any questions.

Add some spice,
Deb
P.S. Thanks Sharon & t_a. I truely appreciate your encouragement.

Friday, 25 July 2014

Two Yokes going at the same time

I'm knitting two circular yokes and am in exactly the same spot on both of them.
Bust shaping (bust dart) is finished on both.
 On the purple one I'm knitting straight to the waist and then I'm going to do the hip shaping I need.

I'm a little short of yarn for the orange one so I'm trying to decide what to do with a shorty top. It may only come to my waist. Not my usual length at all. Got any suggestions?
Deb
P.S. t_a This is Hempton, a cotton, hemp, modal blend. Very nice to knit with. I think it will be lovely to wear. The purple is Cotton Tweed as you had spotted.

Tuesday, 24 June 2014

Simple Circular Yoke

Lyn, Elizabeth and I did a big edit on the new Circular Yoke book today. Lots of "I think we need to move this a little bit to the right" and "could we spread this across the top of the page" and "this is important so we need to emphasize it". It's looking really, really good. Lyn has to do a lot of work on the photos yet. But it's coming along. This end stage takes quite a bit of time but I know the book is better for the time taken. Books, they take a lot of time!

I'm knitting one more Circular Yoke. Yes, another one. This one is the "Simple" version with a Scoop Neck and Garter Stitch Neckband . . .
and Short Rows to lengthen the Back and drop the Front.
How come there always seems to be one more to do?!
-Deb

Friday, 14 February 2014

Colour Knitting

This is the first colour knitting I've done in a very long time. It reminds me that skills can get pretty rusty. I do colour knitting in the two-handed method and since I am a Continental knitter my off-hand is my right hand working in the English throwing style of knitting. I do admire those of you who can do it so effortlessly because I am struggling a bit to get it back. This is yet another options in the Need A Circular Yoke book which we are working on now.

As I proceed I do have some 2-handed colour knitting tips:
1. Use a larger knitting for colourwork rows(rounds) if your fabric tends to pull in.
2. Always use your "good hand" for the background colour. This maintains a good sturdy background fabric and stops you from switching hands part way through your project. If you've ever done this you know it makes the fabric look very different (ask me how I know!).
3. Each time you change colour push the stitches just worked down the Right needle. This will make your floats nice and long.

Do you have any other suggestions to add?
Deb

Friday, 10 January 2014

Circular Yoke II

Second Circular Yoke sample. This one is for the same sized person, me, but in finer yarn. This is worked with Cotton Tweed DK weight yarn and lace stitch patterns. Because this yoke is in finer yarn, with more rows per inch, I can fit 2 Bands of Pattern in. It also has a larger neck opening with a ribbed pattern which I would also put on the cuffs and bottom edge.
Same Basic Circular Yoke sweater as in the last post, different look. I think I'm going to like wearing this one. What do you think?
-Deb

Sunday, 5 January 2014

First CircYoke sample

Moving a little slowly these days since I have a post-Christmas cold, yucky. But work progresses on the Circular Yoke book. I am busy writing a couple of hours every day to get it into some kind of shape. Of course each day I take out some of what I wrote the day before but that's the way it goes. I do have one sample to show you.
This is just one of the ideas. It may look exactly like something I showed before but it has improvements in it. I have added raglan shaping underneath the circular Band of Pattern. This will allow some adjustments to be made to the body and sleeves.
I'm working on another sample yoke in finer yarn to show you some more options we will be adding for the yoke.
Comments on this one?
-Deb

Friday, 27 September 2013

I'm doing some work on a circular yoke with increases around the yoke. It makes a good around Yoke.
But it's getting scratched anyway. It's not going to work for the book.

For the books I usually work a Basic sweater which acts as a template. Onto the template you can add in one of the various pattern stitches we supply or one of your own to make the garment a unique design. So instead of increasing on either side of 1 stitch . . .
I'm going to make 8 spokes several stitches wide where a stitch pattern could live. Similar to this child's sweater.
I'm going to make it really easy to tell which rounds to do the increases on too because once I get started I don't like to have to think too much when I knit either!
-Deb

Wednesday, 31 July 2013

Beginnings are sooo much fun. I've cast on for my first circular yoke in . . . can't remember. But I've already made a decision for a change of yarn since this navy is hard to photograph.
I thought I would start with a basic garter stitch yoke which buttons up the front. You can see that I worked short rows just below the neckband (you can see them on the left side of neckband in photo). Elizabeth from Eliza's Buttons and Yarns is writing this book with me and pointed out that it might be fun to have the buttons going on an angle instead of down the middle of the front. Good thought.  
To give knitters the choice I'm going to put the short rows at the bottom of the yoke instead of right under the neckband. Then the knitter doesn't have to choose where they want the button opening to be until part way down the yoke. They will be able to try it on and play with the yoke to see what they like. Can't wait to see how it works.
-Deb